Vercel
Inngest enables you to host your functions on Vercel using their serverless functions platform. This allows you to deploy your Inngest functions right alongside your existing website and API functions running on Vercel.
Inngest will call your functions securely via HTTP request on-demand, whether triggered by an event or on a schedule in the case of cron jobs.
Hosting Inngest functions on Vercel
After you've written your functions using Next.js or Vercel's Express-like functions within your project, you need to serve them via the serve handler. Using the serve handler, create a Vercel/Next.js function at the /api/inngest endpoint. Here's an example in a Next.js app:
Choose the Next.js App Router or Pages Router:
import { serve } from "inngest/next";
import { client } from "../../inngest/client";
import { firstFunction, anotherFunction } from "../../inngest/functions";

// This endpoint can run for a maximum of 300 seconds
export const maxDuration = 300;

export const { GET, POST, PUT } = serve({
  client: client,
  functions: [
    firstFunction,
    anotherFunction
  ]
});
We strongly recommend that you configure the maxDuration for your Inngest endpoint to ensure that your steps can successfully execute without timeouts. When using with checkpointing (the default in our v4 SDK), you should set checkpointing's maxRuntime option to 20-40% below your maxDuration setting on Vercel. See the Vercel docs for more information.
Note, when streaming is enabled, your function can execute well beyond the maxDuration. Learn more about the streaming option here.
Deploying to Vercel
Installing Inngest's official Vercel integration does 3 things:
- Automatically sets the required
INNGEST_SIGNING_KEYenvironment variable to securely communicate with Inngest's API (docs). - Automatically sets the
INNGEST_EVENT_KEYenvironment variable to enable your application to send events (docs). - Automatically syncs your app to Inngest every time you deploy updated code to Vercel - no need to change your existing workflow!
To enable communication between Inngest and your code, you need to either disable Deployment Protection or, if you're on Vercel's Pro plan, configure protection bypass:
Bypassing Deployment Protection
If you have Vercel's Deployment Protection feature enabled, by default, Inngest may not be able to communicate with your application. This may depend on what configuration you have set:
- "Standard protection" or "All deployments" - This affects Inngest production and branch environments.
- "Only preview deployments" - This affects branch environments.
To work around this, you can either:
- Disable deployment protection
- Configure protection bypass (Protection bypass may or may not be available depending on your pricing plan)
Configure protection bypass
To enable this, you will need to leverage Vercel's "Protection Bypass for Automation" feature. Here's how to set it up:
- Enable "Protection Bypass for Automation" on your Vercel project
- Copy your secret
- Go to the Vercel integration settings page in the Inngest dashboard
- For each project that you would like to enable this for, add the secret in the "Deployment protection key" input. Inngest will now use this parameter to communicate with your application to bypass the deployment protection.
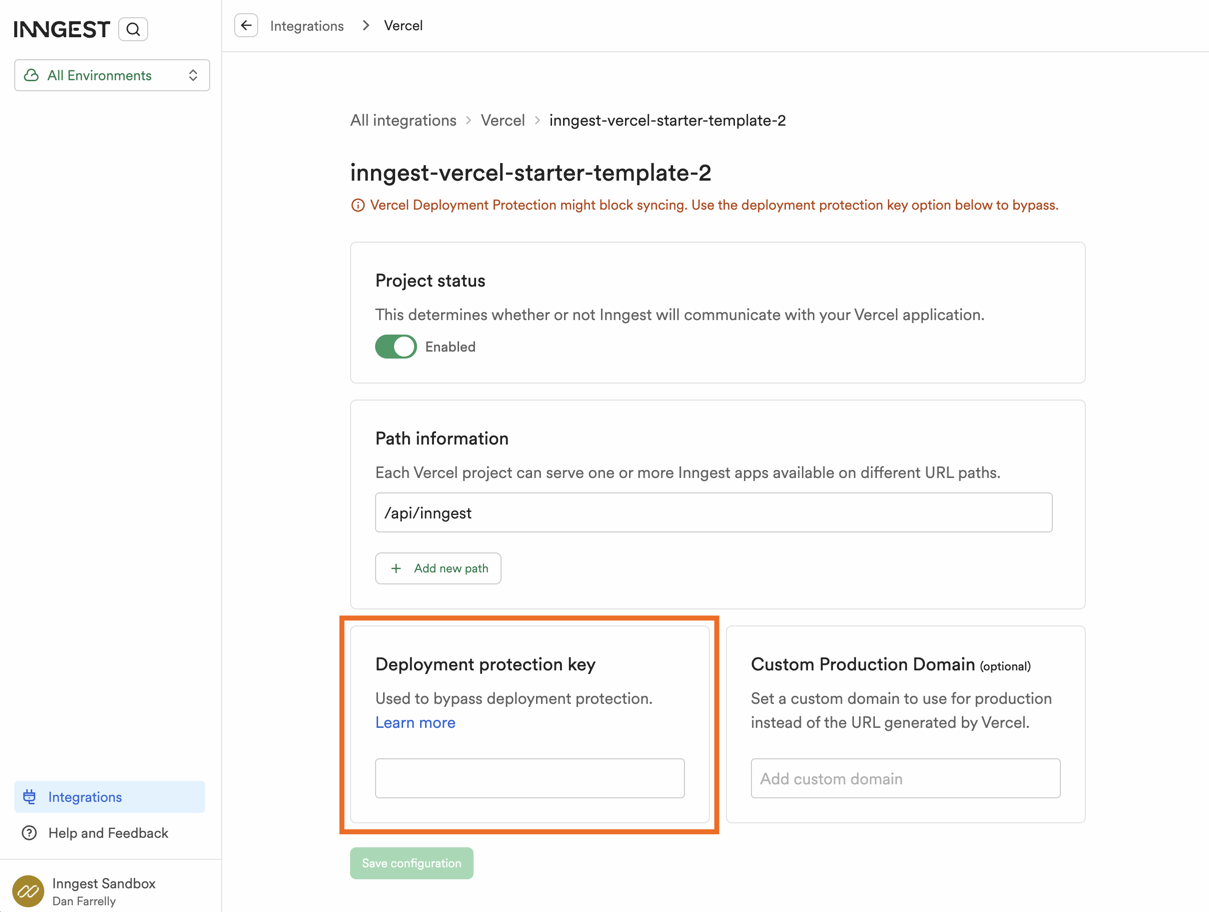
- Trigger a re-deploy of your preview environment(s) (this resyncs your app to Inngest)
Overriding the default hostname
By default, Inngest uses your Vercel project's "deployment urls" to sync with Inngest. When you deploy, Vercel's webhook sends these URLs to Inngest which are unique for each version of your code that you deploy. These unique URLs are used both for production deploys and branch environments. The URLs used in production are not preview environments. One of these URLs might look like this:
https://myapp-pxz35n5o2-acmeinc.vercel.app
If you desire Inngest to use your custom domain in production, you can set the INNGEST_SERVE_ORIGIN in your Vercel project's environment variables for production. When you push to production and Inngest syncs your app, it will instead use this URL. Please note: if your application is not reachable on this URL, your app sync will fail.
INNGEST_SERVE_ORIGIN=https://acme.com
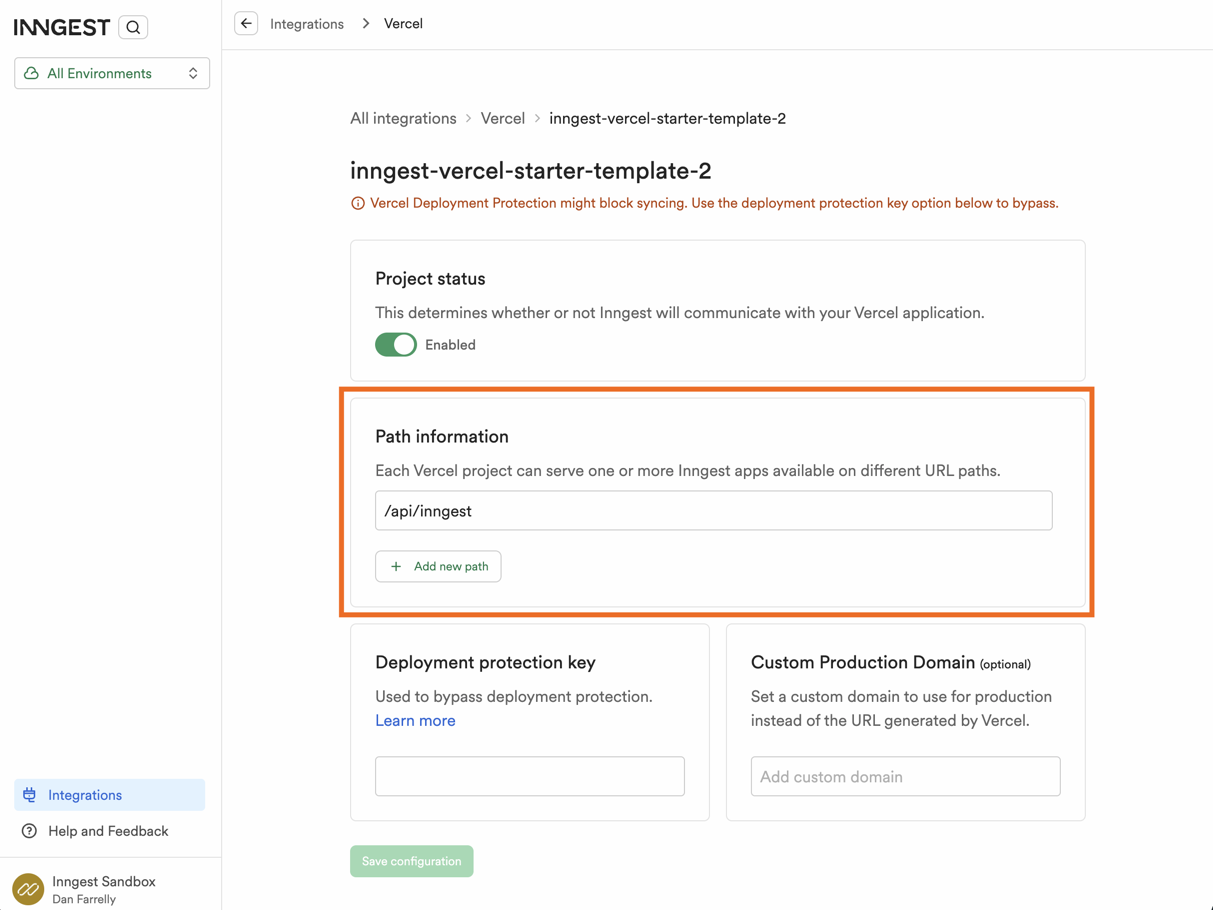
Multiple apps in one single Vercel project
You can pass multiple paths by adding their path information to each Vercel project in the Vercel Integration’s settings page.
Setting up a staging environment
If you prefer to set up a dedicated staging environment instead of using branch environments, you can do that leveraging Inngest's custom environments and Vercel's custom environments. Here are the steps to set that up correctly:
- Create a Vercel custom environment (docs)
- Create an Inngest custom environment (docs)
- Create an Inngest Event Key in your new custom environment with a memorable name like "Vercel - My app" (docs). Copy this for later.
- Copy your Inngest Signing Key
- In the Vercel project dashboard, add two new environment variables,
INNGEST_EVENT_KEYandINNGEST_SIGNING_KEYusing your two copied values, selecting only to use them for your new custom environment, e.g. "staging."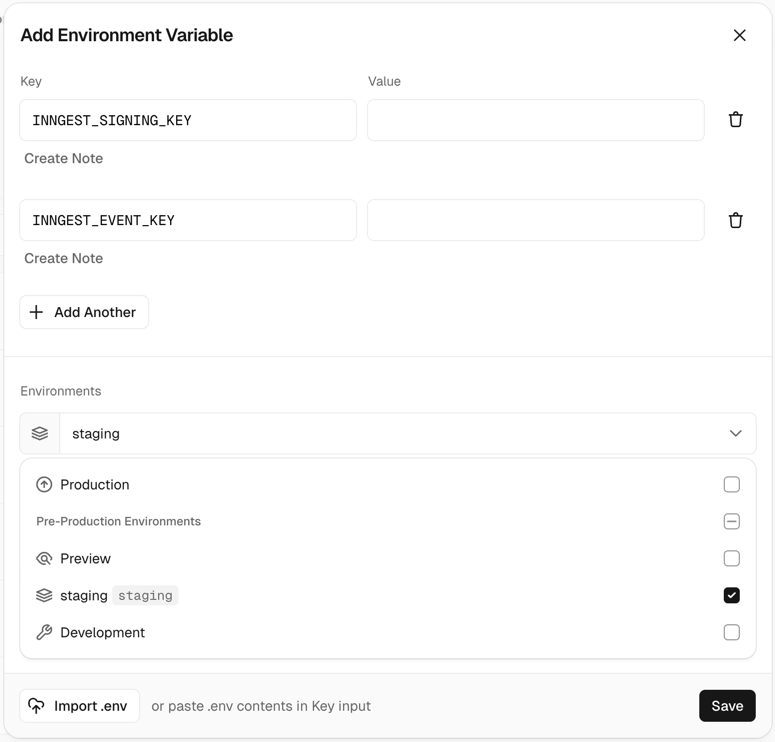
- If using the Vercel integration, the next time you deploy, the app should be synced to your custom environment in Inngest. If you don't use the Vercel integration, you will have to manually sync your app after you deploy (see section below).
Manually syncing apps
While we strongly recommend our Vercel integration, you can still use Inngest by manually telling Inngest that you've deployed updated functions. You can sync your app via the Inngest UI or via our API with a curl request.