Local development
Testing background jobs, durable workflows, and event-driven functions locally is notoriously painful. Most solutions require running a full Redis stack, managing separate worker processes, or writing mocks that don't reflect how your code behaves in production. The Inngest Dev Server eliminates all of that with a single command, giving you a complete local environment with the same execution model, flow control, and observability you get in production.
The Inngest Dev Server is a fully-featured and open-source local version of the Inngest Platform enabling a seamless transition from your local development to feature, staging and production environments.

Getting started
You can start the dev server with a single command. The dev server will attempt to find an Inngest serve API endpoint by scanning ports and endpoints that are commonly used for this purpose (See "Auto-discovery"). Alternatively, you can specify the URL of the serve endpoint:
# Install the CLI - follow the steps to complete install:
curl -sSfL https://cli.inngest.com/install.sh | sh
# Run the dev server
inngest dev -u http://localhost:3000/api/inngest
You can now open the dev server's browser interface on http://localhost:8288.
Set the INNGEST_DEV=1 environment variable when starting your app so it connects to the local Dev Server instead of Inngest Cloud. You can add this to your .env file or pass it inline: INNGEST_DEV=1 npm run dev. Learn more about local development environment variables.
AI-assisted local development
The Dev Server also exposes a local Model Context Protocol (MCP) integration at http://127.0.0.1:8288/mcp. Connect Claude Code, Cursor, or another MCP-compatible coding agent to list registered functions, send test events, invoke functions, and inspect run status while your app is running locally.
Connecting apps to the Dev Server
There are two ways to connect apps to the Dev Server:
- Automatically: The Dev Server will attempt to "auto-discover" apps running on common ports and endpoints (See "Auto-discovery").
- Manually: You scan explicitly add the URL of the app to the Dev Server using one of the following options:
- Using the CLI
-uparam (ex.inngest dev -u http://localhost:3000/api/inngest) - Adding the URL in the Dev Server Apps page. You can edit the URL or delete a manually added app at any point in time
- Using the
inngest.json(or similar) configuration file (See "Configuration file")
- Using the CLI

The dev server does "auto-discovery" which scans popular ports and endpoints like /api/inngest and /.netlify/functions/inngest. If you would like to disable auto-discovery, pass the --no-discovery flag to the dev command. Learn more about this below
How functions are loaded by the Dev Server
The dev server polls your app locally for any new or changed functions. Then as events are sent, the dev server calls your functions directly, just as Inngest would do in production over the public internet.

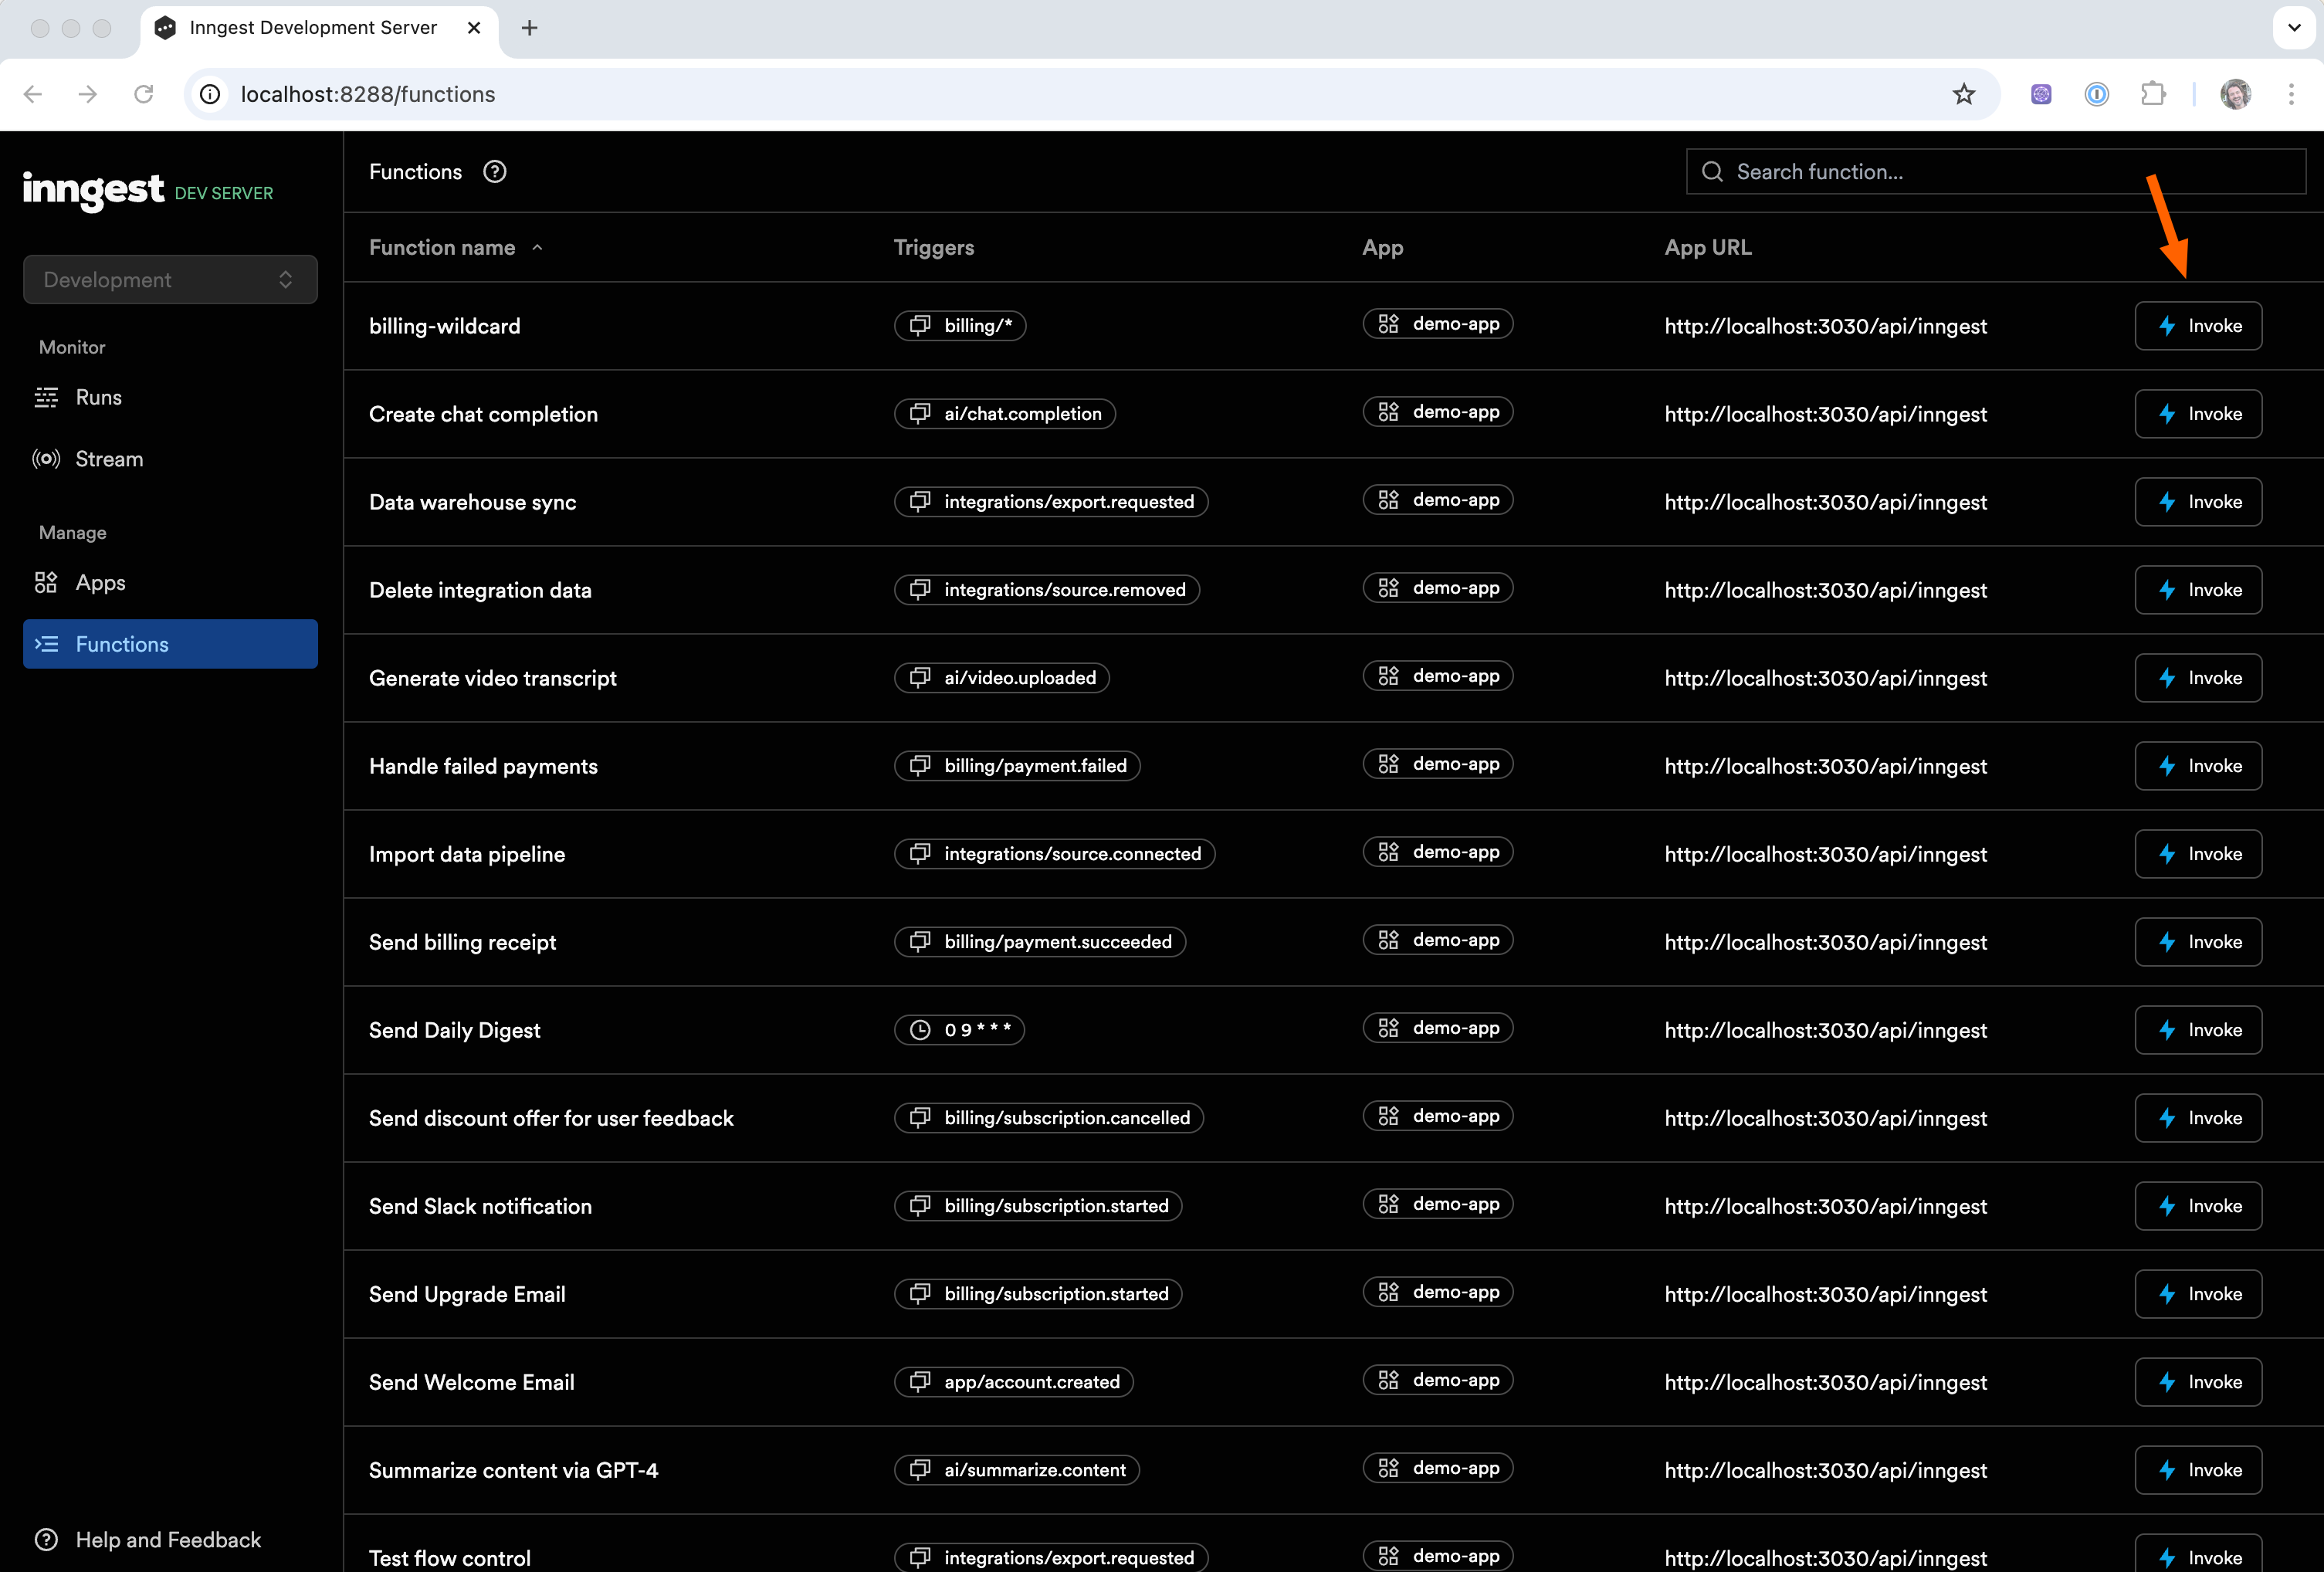
Testing functions
Invoke via UI
From the Functions tab, you can quickly test any function by click the "Invoke" button and providing the data for your payload in the modal that pops up there. This is the easiest way to directly call a specific function:
Sending events to the Dev Server
There are different ways that you can send events to the dev server when testing locally:
- Using the Inngest SDK
- Using the "Test Event" button in the Dev Server's interface
- Via HTTP request (e.g. curl)
Using the Inngest SDK
When using the Inngest SDK locally, it tries to detect if the dev server is running on your machine. If it's running, the event will be sent there.
import { Inngest } from "inngest";

const inngest = new Inngest({ id: "my_app" });
await inngest.send({
  name: "user.avatar.uploaded",
  data: { url: "https://a-bucket.s3.us-west-2.amazonaws.com/..." },
});
Note - During local development, you can use a dummy value for your INNGEST_EVENT_KEY environment variable. The dev server does not validate keys locally.
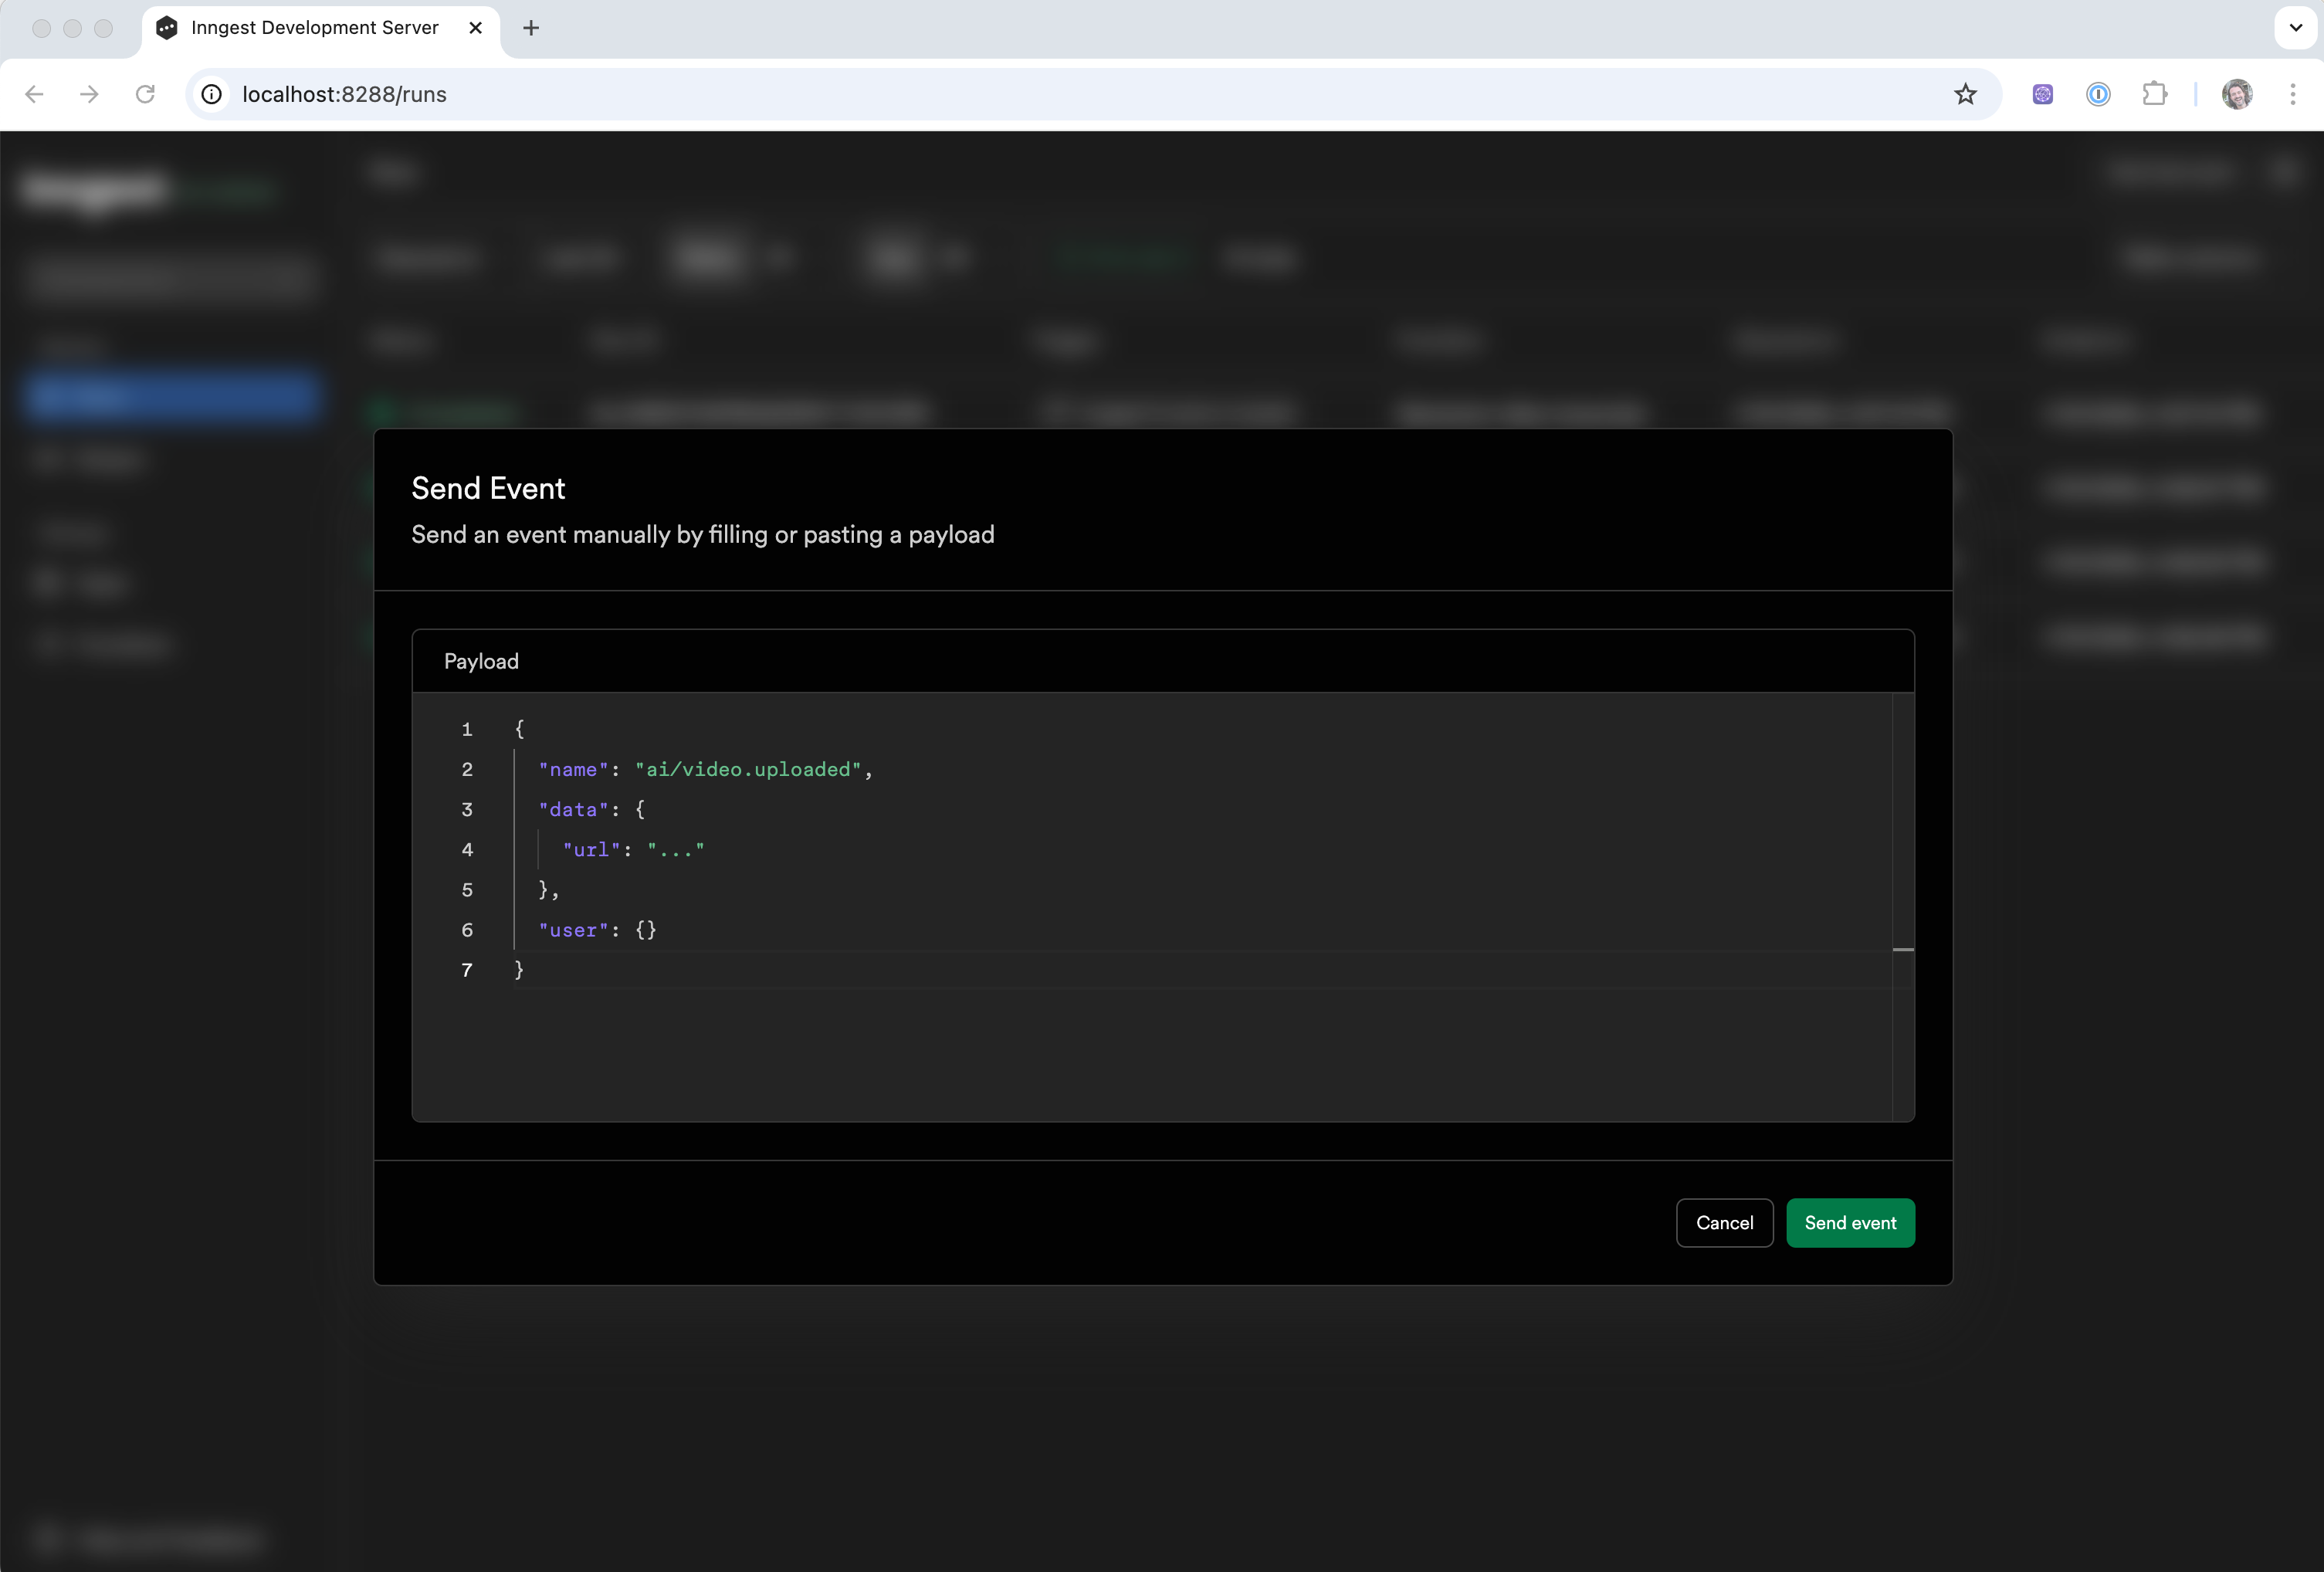
Using the "Test Event" button
The dev server's interface also has a "Test Event" button on the top right that enables you to enter any JSON event payload and send it manually. This is useful for testing out different variants of event payloads with your functions.
Via HTTP request
All events are sent to Inngest using a simple HTTP API with a JSON body. Here is an example of a curl request to the local dev server's /e/<EVENT_KEY> endpoint running on the default port of 8228 using a dummy event key of 123:
curl -X POST -v "http://localhost:8288/e/123" \
  -d '{
    "name": "user.avatar.uploaded",
    "data": { "url": "https://a-bucket.s3.us-west-2.amazonaws.com/..." }
  }'
💡 Since you can send events via HTTP, this means you can send events with any programming language or from your favorite testing tools like Postman.
Configuration file
When using lots of configuration options or specifying multiple -u flags for a project, you can choose to configure the CLI via inngest.json configuration file. The dev command will start in your current directory and walk up directories until it finds a file. yaml, yml, toml, or properties file formats and extensions are also supported. You can list all options with dev --help. Here is an example file specifying two app urls and the no-discovery option:
{
  "sdk-url": [
    "http://localhost:3000/api/inngest",
    "http://localhost:3030/api/inngest"
  ],
  "no-discovery": true
}
Inngest SDK debug endpoint
The SDK's serve API endpoint will return some diagnostic information for your server configuration when sending a GET request. You can do this via curl command or by opening the URL in the browser.
Here is an example of a curl request to an Inngest app running at http://localhost:3000/api/inngest:
$ curl -s http://localhost:3000/api/inngest | jq
{
  "message": "Inngest endpoint configured correctly.",
  "hasEventKey": false,
  "hasSigningKey": false,
  "functionsFound": 1
}
Auto-discovery
The dev server will automatically detect and connect to apps running on common ports and endpoints. You can disable auto-discovery by passing the --no-discovery flag to the dev command:
npx --ignore-scripts=false inngest-cli@latest dev --no-discovery -u http://localhost:3000/api/inngest
/api/inngest
/x/inngest
/.netlify/functions/inngest
/.redwood/functions/inngest
CLI flags
inngest-cli dev command supports the following flags:
| Long form | Short form | Type | Default value | Description |
|---|---|---|---|---|
| --config | - | string | - | Path to an Inngest configuration file |
| --help | -h | - | - | Output the help information |
| --host | - | string | http://localhost | Inngest server host |
| --no-discovery | - | boolean | false | Disable app auto-discovery |
| --no-poll | - | boolean | false | Disable polling of apps for updates |
| --port | -p | int | 8288 | Inngest server port |
| --sdk-url | -u | strings | http://localhost:3000/api/inngest | App serve URLs to sync |
Development with Docker
Inngest provides a Docker image that you can use to run the Inngest Dev Server within a container. This is useful when running Inngest locally or in a CI/CD environment.
Docker image
The inngest/inngest image is available on Docker Hub. Regular updates are made to this image, so we recommend pulling the latest version. You can find the latest version release on our Github repo.
docker pull inngest/inngest
Standalone Docker container
Docker can be useful for running the Inngest Dev Server in a standalone container. This is useful if you do not want to use the npx --ignore-scripts=false inngest-cli@latest method to run the Dev Server.
To run the Inngest container, you'll need to:
- Expose the Dev Server ports (
8288,8289). - Use the
inngest devcommand with the-uflag to specify the URL where Inngest can find your app.
In this example command, our app is running on the host machine on port 3000. We use the host.docker.internal hostname to connect to the host machine from within the Docker container. For ease of reading, the command is broken up into multiple lines.
docker run -p 8288:8288 -p 8289:8289 \
  inngest/inngest \
  inngest dev -u http://host.docker.internal:3000/api/inngest
You will then be able to access the Inngest Dev Server on your host machine at http://localhost:8288 or whatever hostname you have configured. You may need to adjust the hostname for your app if you are using a different Docker network setup.
If you decide to run the Dev Server on another port, you will need to set the INNGEST_BASE_URL environment variable in your app to point to the correct port. This value defaults to http://localhost:8288.
Docker Compose
If you're using Docker Compose to run your services locally, you can easily add Inngest to your local environment. Here's an example docker-compose.yml file that includes Inngest:
docker-compose.yamlservices:
app:
build: ./app
environment:
- INNGEST_DEV=1
- INNGEST_BASE_URL=http://inngest:8288
ports:
- '3000:3000'
inngest:
image: inngest/inngest
command: 'inngest dev -u http://app:3000/api/inngest'
ports:
- '8288:8288'
- '8289:8289' # Used for connect()
In this example, we have two services: app and inngest. The app service is your application, and the inngest service is the Inngest Dev Server. There are a few key configurations to note:
- The
INNGEST_DEV=1environment variable tells the Inngest SDK it should connect to the Dev Server*. - The
INNGEST_BASE_URL=http://inngest:8288environment variable tells the Inngest SDK where the Dev Server is running. In our example, theinngestservice is running on port8288(the default Dev Server port). - The
command: 'inngest dev -u http://app:3000/api/inngest'command tells the Dev Server where to find your app within the Docker network. In this example, theappservice is running on port3000. - The
portsconfiguration exposes the Dev Server on port8288so you can view this on your host machine in the browser. It also exposes8289which is used forconnect().
* - The TypeScript SDK defaults to cloud mode. Setting INNGEST_DEV=1 explicitly enables dev mode, which connects to the Dev Server and disables signature verification.
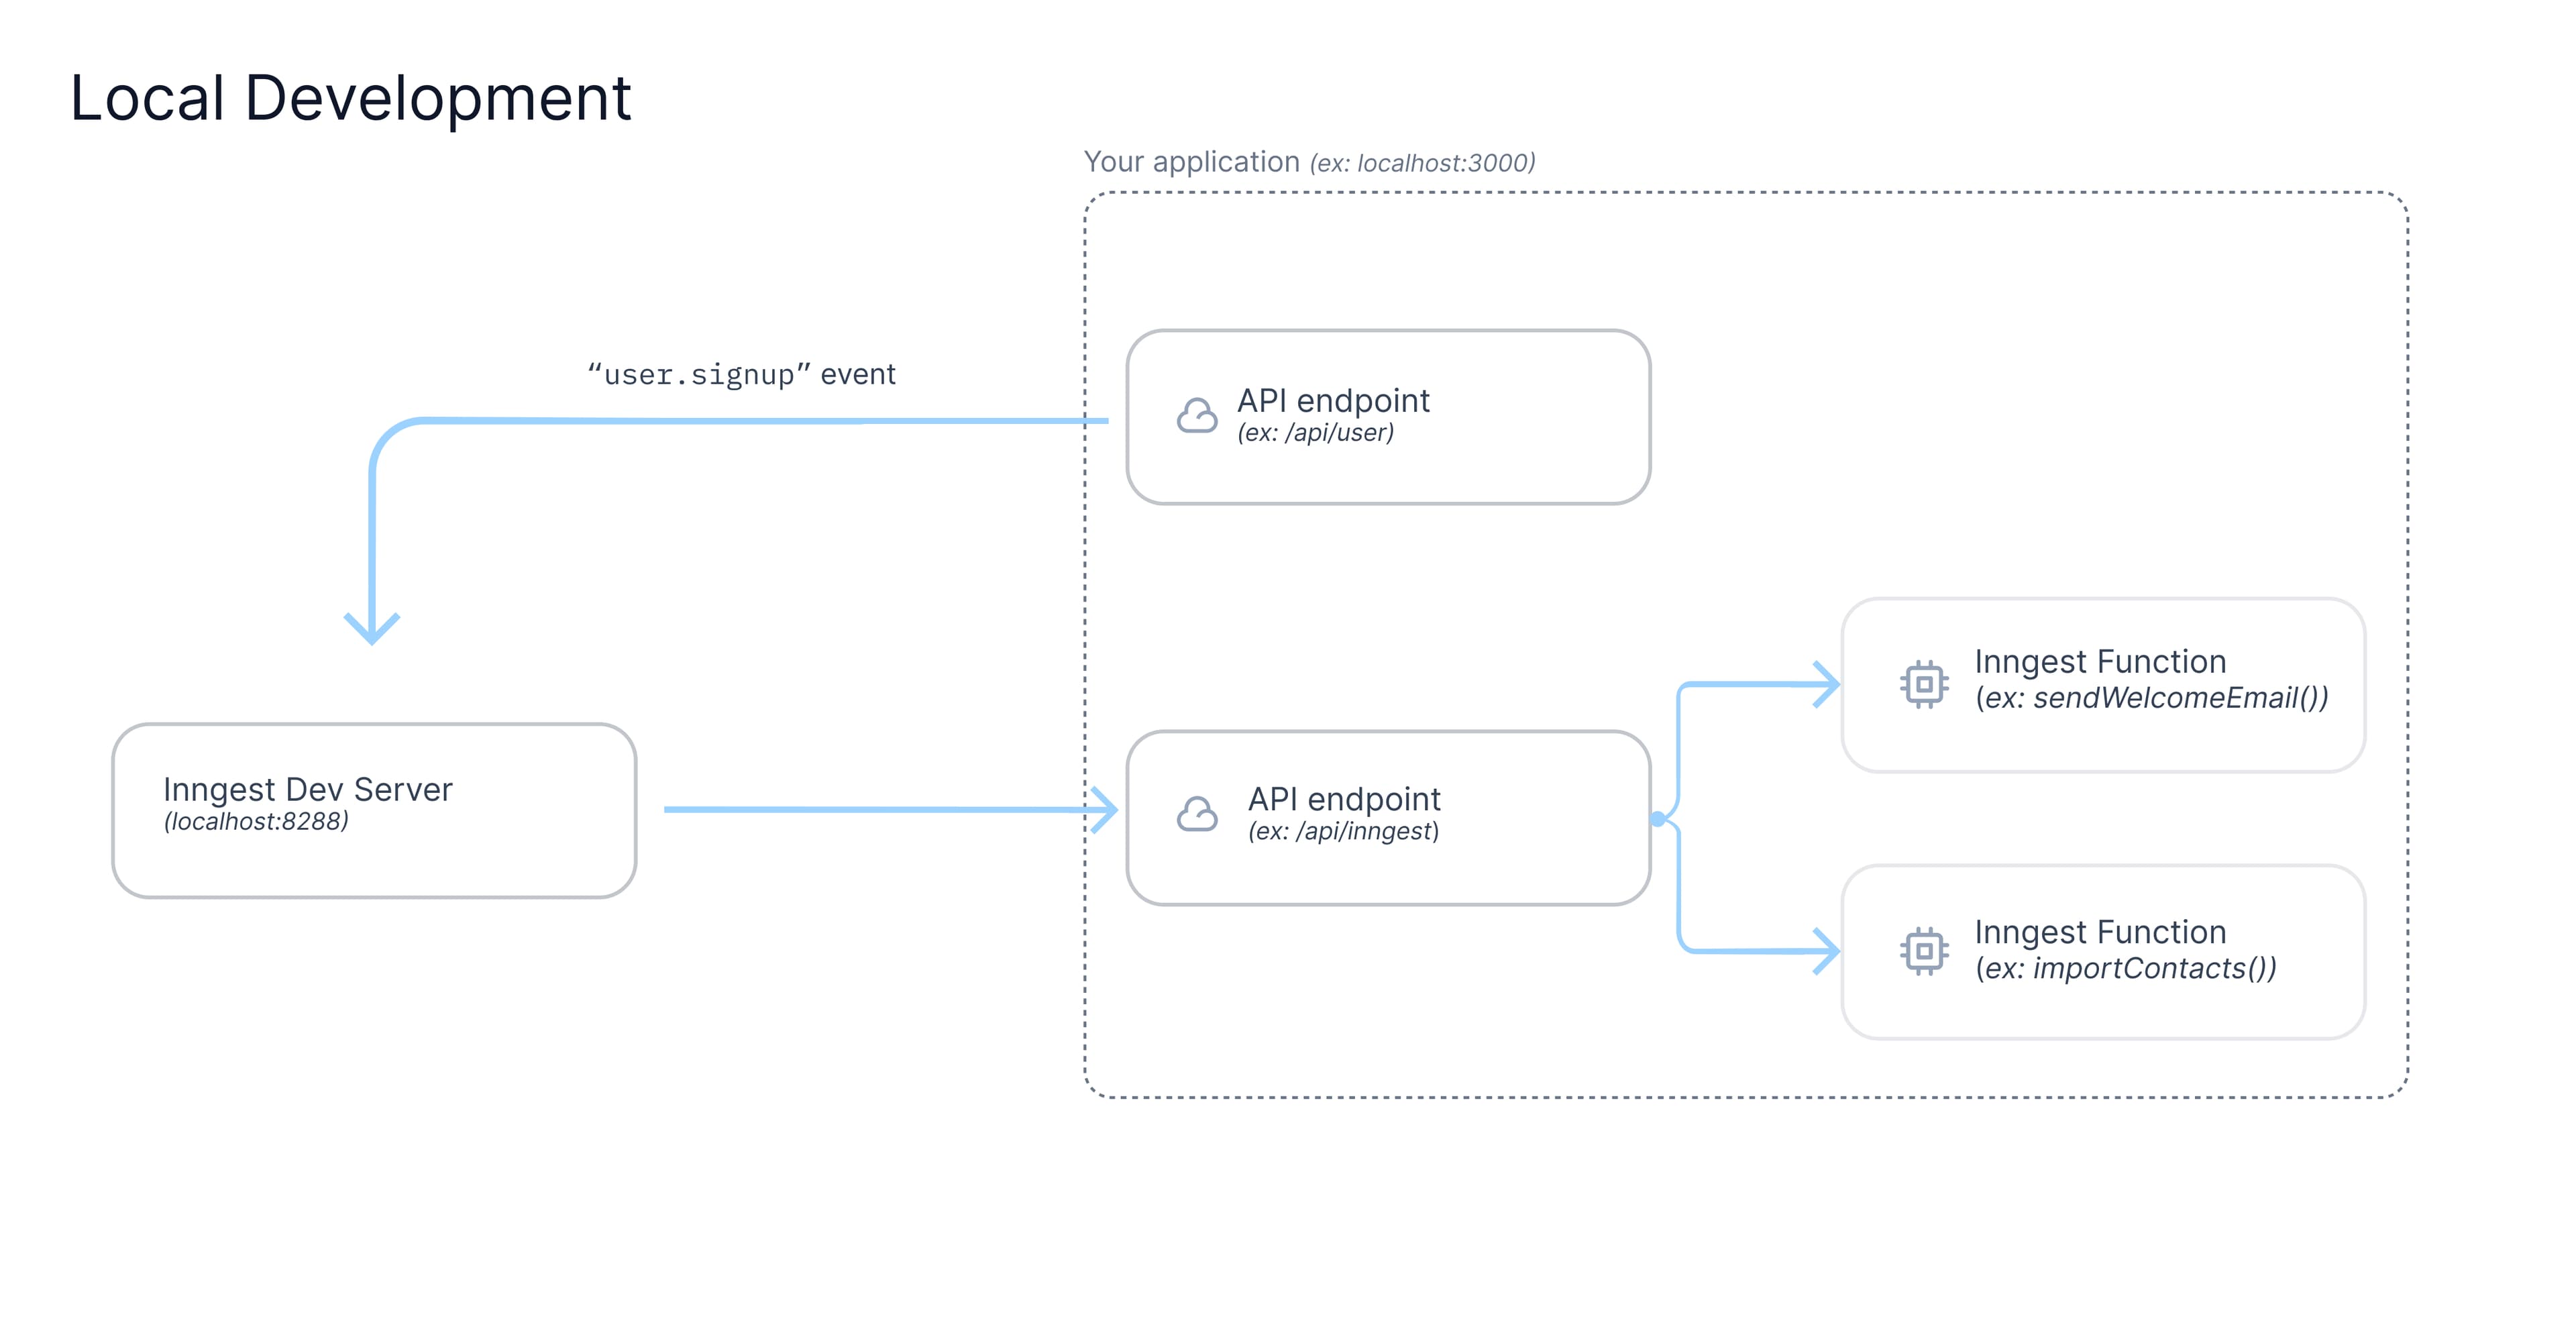
Development flow
Developing with Inngest looks as it follows:
- Configure the Inngest SDK in your application
- Connecting the Inngest Dev Server to your local application
- Develop your Inngest Functions with Steps, Flow Control and more
- (Optional) - Configure Preview environments with our Vercel Integration

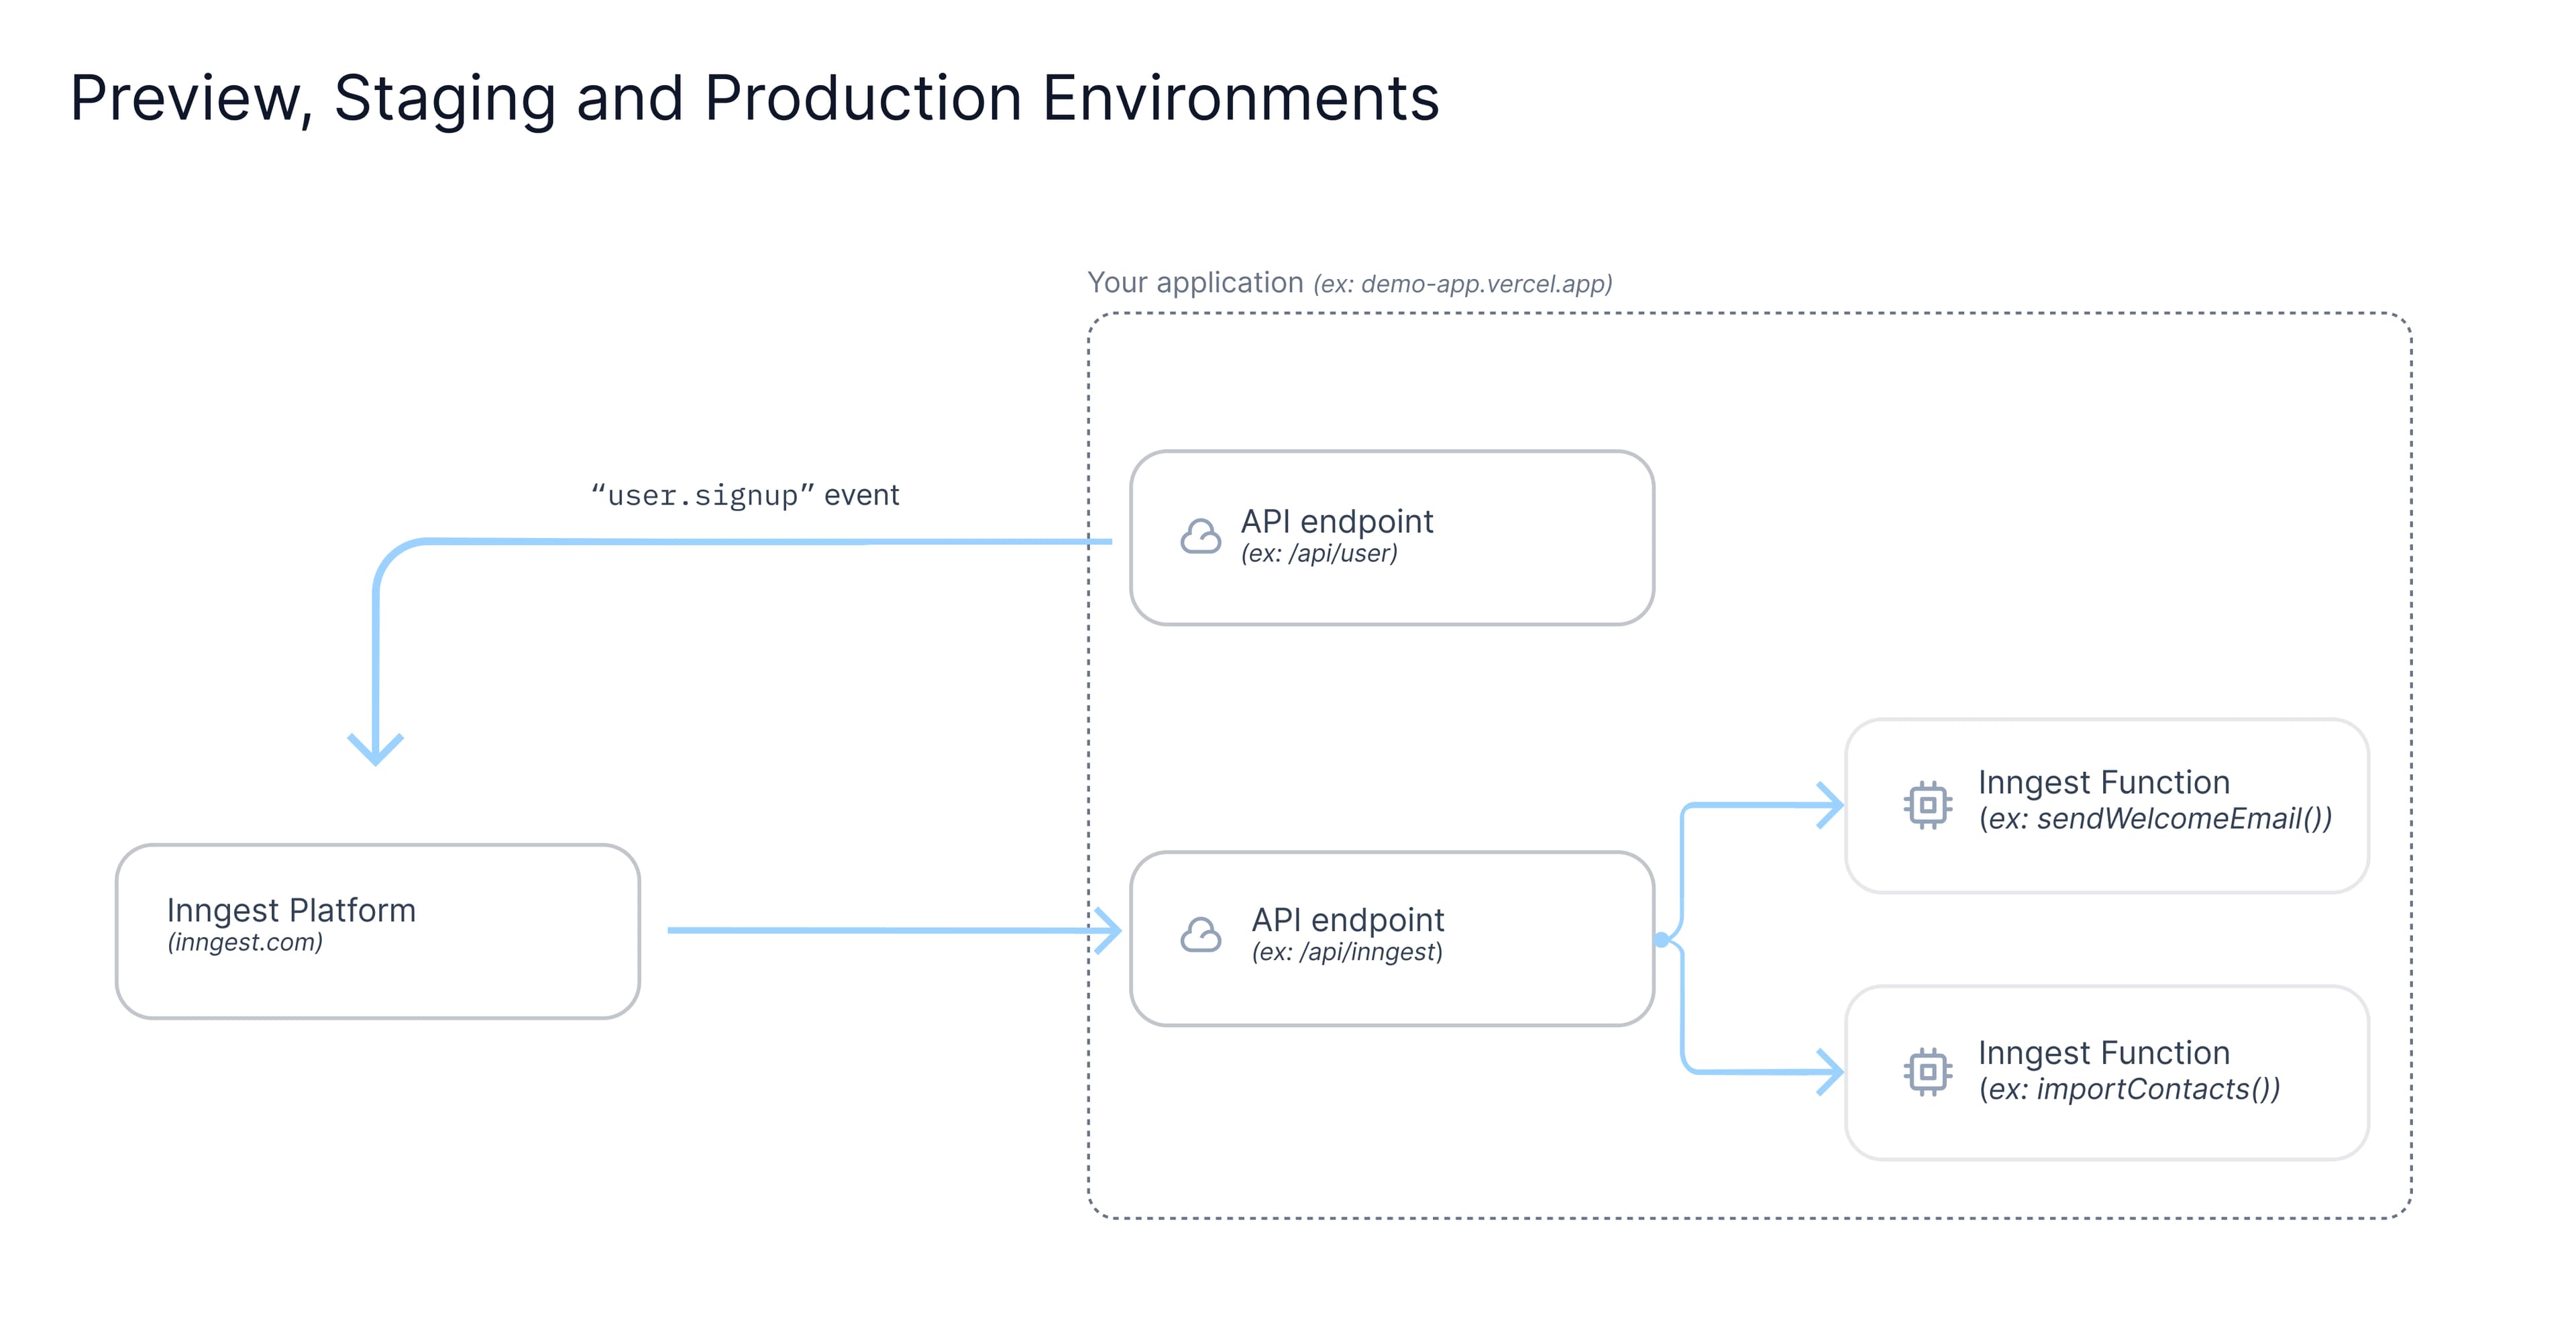
Moving to production environments (preview envs, staging or production)
Deploying your application to preview, staging and production environments does not require any code change:
- Create an Inngest App on the Inngest Platform and configure its Event and Signing Keys on your Cloud.
- Leverage the Inngest Platform to manage and monitor Events and Function Runs

SDKs
TypeScript SDK
Setup the Inngest SDK in your TypeScript application.
Python SDK
Setup the Inngest SDK in your Python application.
Go SDK
Setup the Inngest SDK in your Go application.
FAQs
Can I run the Inngest Dev Server in production?
The Inngest Dev Server is not designed to be run in production, but you can run it anywhere that you want including testing environments or CI/CD pipelines.
How do I test webhooks locally?
Webhooks configured on the Platform can be sent to the Dev Server.
How do I work with Stripe or Clerk webhooks locally?
External webhooks from Stripe and Clerk must go through a tunnel solution (such as ngrok or localtunnel) to reach the Dev Server.
Are Crons supported locally?
Yes. You can also trigger a function at any time by using the "Invoke" button from the Dev Server Functions list view.
Find more answers in our Discord community.