Building auth workflows with Clerk and Inngest
How to trigger Inngest functions with Clerk events in the new integration
Dan Farrelly· 1/24/2024 (Updated: 1/7/2026) · 6 min read
Clerk is the easiest way to add authentication and user management to your application. By now, most developers know about Clerk's drop-in React components and SDKs that make integrating a breeze. One underappreciated feature that Clerk offers is webhooks.
Clerk's webhooks allow your application to react to changes asynchronously. When a user.created event is triggered, you may want to:
- Sync user data to your database
- Kick off an account provisioning workflow
- Start a trial in Stripe
- Send a welcome email or start a drip campaign
- Add the user to your product newsletter in Mailchimp
Today, with Clerk's new Inngest webhook transformation template, you can easily use Clerk webhook events to trigger Inngest functions.
Connecting Clerk + Inngest
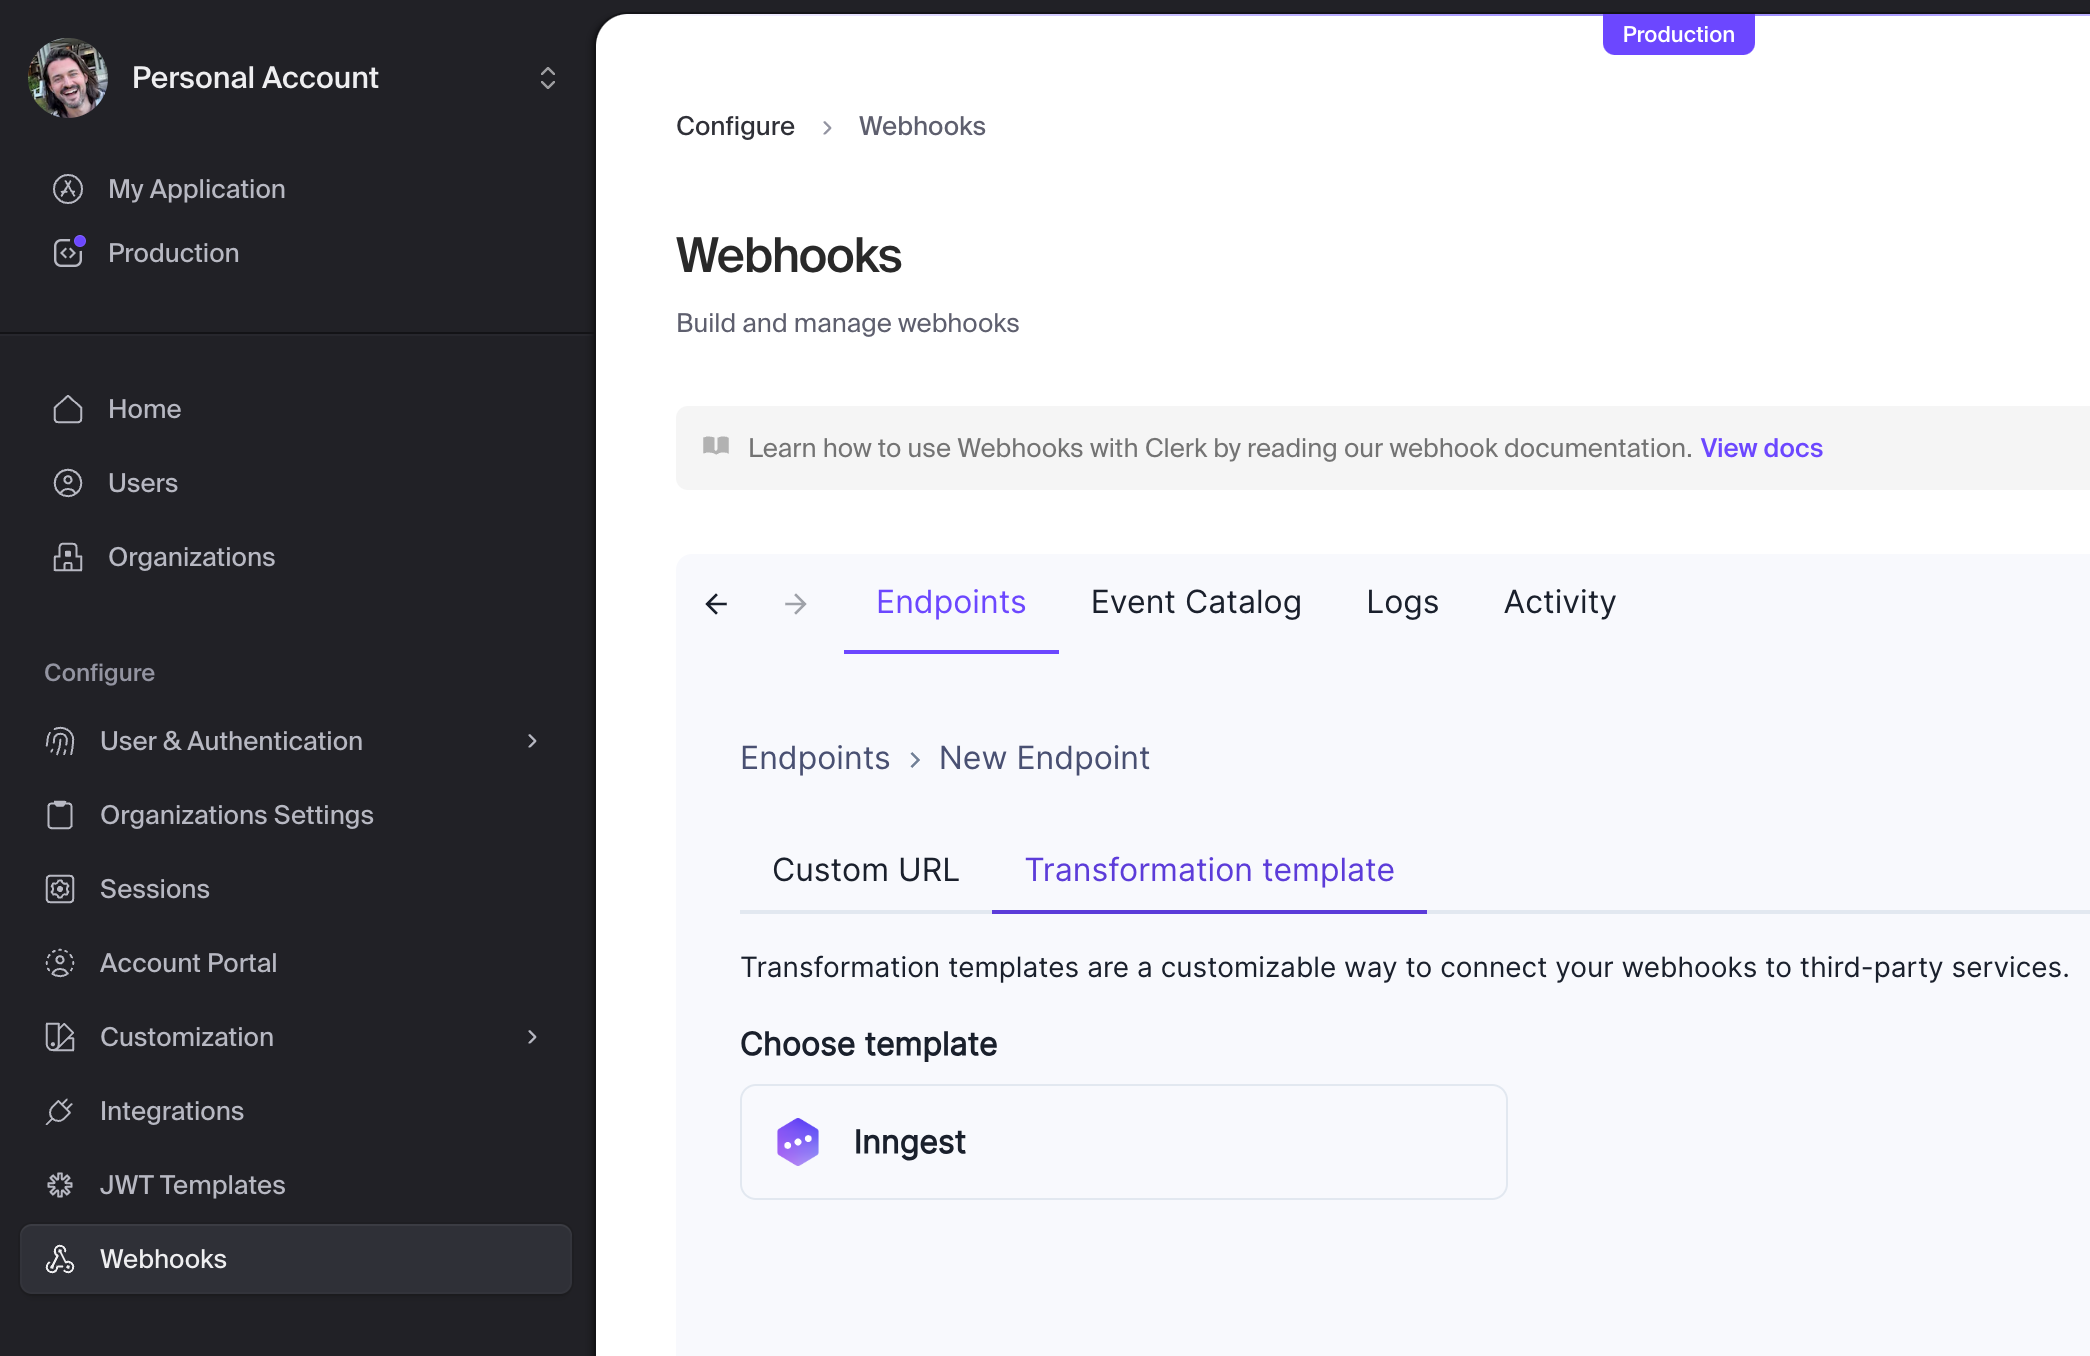
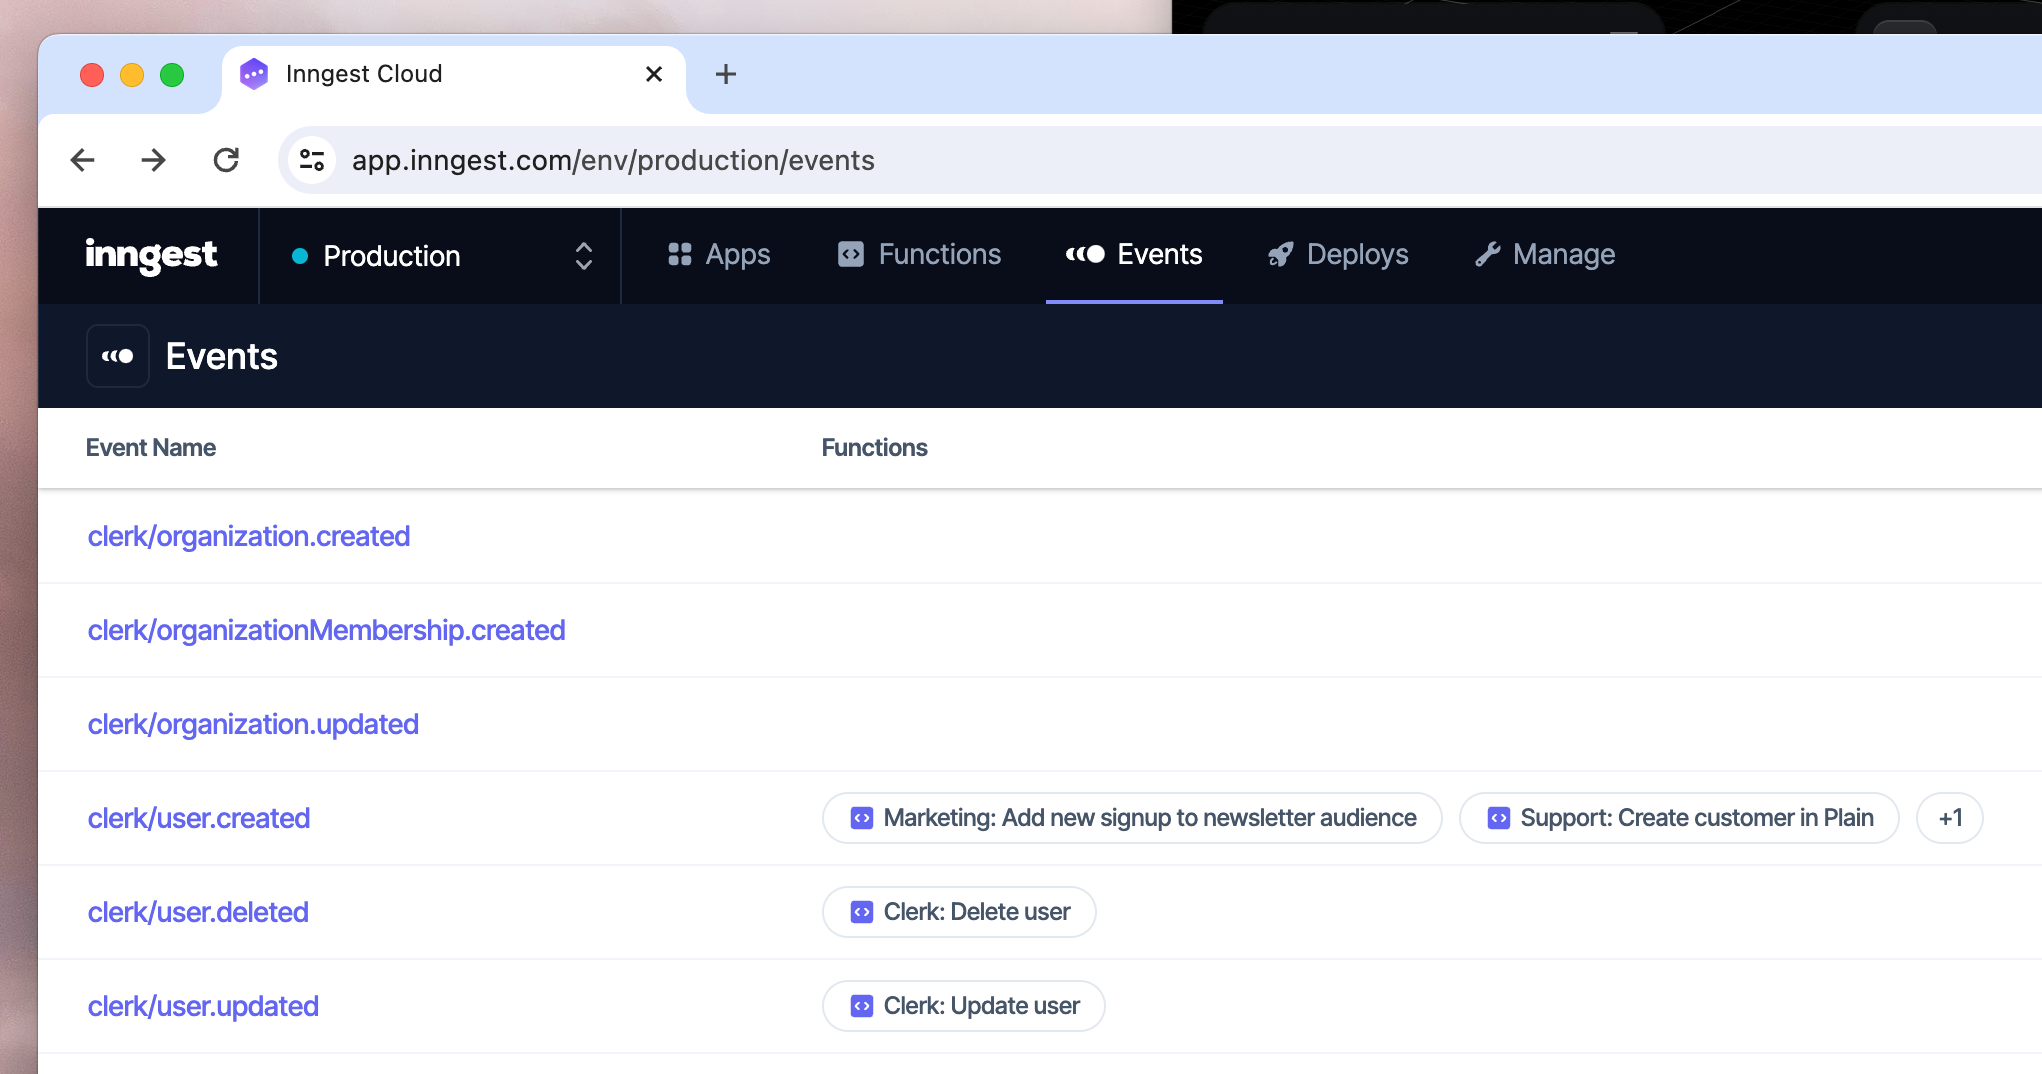
From Clerk's webhook portal, you can now connect your account with Inngest in just a couple of clicks. Powered by a new integration between Svix and Inngest, you can select the Inngest transformation template and “Connect to Inngest.” In seconds, you will start receiving all Clerk events that you select within your Inngest account; you'll start to see all of the Clerk events under a useful clerk/ prefix in your Inngest dashboard.

The Clerk dashboard's Webhook page

Clerk events in the Inngest dashboard
Why use Inngest for webhooks?
You could write your own webhook handler for Clerk, but using Inngest for webhook events has key benefits:
- Manage concurrency with configurable limits to the exact level of concurrent events processed to avoid overwhelming your database or APIs, enabling you to operate and scale webhooks.Inngest is designed to handle high load so you don't need to worry about the pitfalls of operating and scaling webhooks.
- Fan-out events to multiple functions to run work in parallel, each with automatic retries. You can have two jobs.
- Create complex workflows that require multiple steps that are each automatically retried (a la transactions).
- Delay certain tasks for hours or days with
step.sleep()orstep.sleepUntil().
See it in action
Let's take some of the ideas mentioned above and create some Inngest functions triggered by Clerk events.
First, we create a simple welcome email triggered by our new clerk/user.created event. We'll use React email and Resend to send our new user some tips on how to be successful with our product:
const welcomeEmail = inngest.createFunction(
  { name: "Send welcome email", id: "send-welcome-email", concurrency: 10 },
  { event: "clerk/user.created" },
  async ({ event, step }) => {
    const email = event.data.email_addresses[0].email_address;
    await step.run('send-email', async () => {
      return await resend.emails.send({
        to: email,
        from: "noreply@inngest.com",
        subject: "Welcome to Inngest!",
        react: WelcomeEmail(),
      })
    });
  }
)
That was easy! Now, we have a paid plan with some great features that we'd like to start a 14 day trial for in Stripe. Since Inngest is powered by events, we can create multiple functions that are triggered by the clerk/user.created event. Both are run separately and in parallel, which means that if a third party API goes down for a few minutes, the other function is not affected.
const createTrial = inngest.createFunction(
  { name: "Create trial", id: "create-trial" },
  { event: "clerk/user.created" },
  async ({ event, step }) => {
    const name = event.data.first_name + " " + event.data.last_name;
    const email = event.data.email_addresses[0].email_address;

    const customer = await step.run('create-customer', async () => {
      return await stripe.customers.create({
        name,
        email,
      });
    })

    await step.run('create-subscription', async () => {
      return await stripe.subscriptions.create({
        customer: customer.id,
        items: [
          {
            price: 'price_1MowQULkdIwHu7ixraBm864M',
          },
        ],
        trial_period_days: 14,
      });
    })
  }
)
With these two functions, we might then extend one of them to, for example, send an email midway through the trial. This is as easy as adding step.sleep() and another step to send the email. You just created a drip campaign triggered from the original Clerk event in a few lines of code!
await step.sleep('7d');
await step.run('trial-check-in-email', async () => {
  return await resend.emails.send({
    to: email,
    from: "noreply@inngest.com",
    subject: "One week left on your trial!",
    react: TrialCheckInEmail(),
  })
});
As you might be able to see, there is a ton that you could do from here using all of the Clerk events. We've even got a few more ideas for you in our Clerk guide in our docs.
How do I get started?
Once you set up the Inngest webhook with Clerk, you can run through this Inngest quick start or check out example projects for your framework of choice. If you want to learn more about Inngest webhooks, check out the guide here.
Enhanced webhook support
Released in October and November 2025, Inngest webhooks now include powerful new capabilities:
New Content Types Support
Inngest webhooks now support additional content types beyond JSON:
application/x-www-form-urlencoded- Perfect for HTML form submissionsmultipart/form-data- Handle file uploads and complex form data
Your webhook transform functions receive both parsed data and the raw body:
function transform(json, headers, queryParams, raw) {
  // json - Parsed payload (works for JSON, form-urlencoded, and multipart)
  // raw - Raw request body for custom processing

  return {
    name: "form.submitted",
    data: {
      formData: json,
      contentType: headers['content-type'],
      rawPayload: raw  // Available if you need it
    }
  };
}
Use cases:
- Process Shopify webhooks that use form-urlencoded
- Handle Typeform submissions with file attachments
- Accept HTML form submissions directly
- Integrate with legacy systems that don't send JSON
Webhook Management API
Manage webhooks programmatically through the Inngest REST API:
# Create a webhook
POST /v1/webhooks
{
  "name": "Stripe webhook",
  "url": "/webhooks/stripe",
  "transform": "function transform(json, headers, queryParams, raw) { return { name: 'stripe/event', data: json }; }"
}

# Update transform function
PATCH /v1/webhooks/:id
{
  "transform": "function transform(json, headers, queryParams, raw) { /* updated logic */ }"
}

# List all webhooks
GET /v1/webhooks

# Delete webhook
DELETE /v1/webhooks/:id
Benefits:
- Version control - Store webhook transforms in your repo
- Unit testing - Test transform functions in CI/CD
- Programmatic creation - Create webhooks for each customer dynamically
- Infrastructure as code - Define webhooks alongside your app config
Perfect for:
- Multi-tenant apps that create webhooks per customer
- Teams using GitOps workflows
- Platforms that need webhook provisioning APIs
- Testing webhook logic before deploying
View webhook API docs | Content types changelog | Management API changelog
Onward
We're big fans of Clerk at Inngest (we use it ourselves!) and we've had tons of our own Inngest functions already powered by events from Clerk. Clerk's done some fantastic work bringing great developer experience to auth and user management for many devs and we're excited to see what you build when you combine Clerk and Inngest!