Background jobs are core to web applications, keeping the user experience responsive by moving some backend work outside of the API.
With background jobs, any backend work not directly tied to the user experience or slow operations such as importing contacts is moved into asynchronous backend operations. These background jobs can send updates upon completion, for example, via emails, or send real-time updates with streamed messages to keep users informed of the process (for example, sending a batch of emails).
In this article, you'll learn how to add background jobs with real-time updates in Next.js using Inngest.
Project overview: CampaignCraft
CampaignCraft is a Next.js application that helps in sending personalized email campaigns by automatically segmenting uploaded contacts CSV files and drafting AI campaigns.
CampaignCraft is built with the following technologies:
- Next.js - The full-stack application framework
- Shadcn - The UIKit library providing all UI components
- Vercel - The de facto deployment platform for Next.js applications
- OpenAI - To power all AI features
- Neon - Our Postgres database to store contacts and campaigns
- Drizzle - The ORM used to interact with the Neon database
- Inngest - The background jobs engine powering our contacts import and campaign sending features
The two primary features of CampaignCraft—automatically segmenting uploaded contact files and sending campaigns—leverage background jobs with real-time updates for a smoother user experience.
The final project is available on GitHub along with README setup instructions.
Implementation overview
Our project relies on two main concepts to deliver a smooth user experience: background jobs and real-time updates.
How do background jobs work?
Background jobs allow your application to handle time-consuming or resource-intensive tasks outside of the main user request/response cycle. Instead of making users wait for operations like importing large CSV files, sending bulk emails, or generating AI-powered content, you can offload these tasks to run asynchronously in the background.
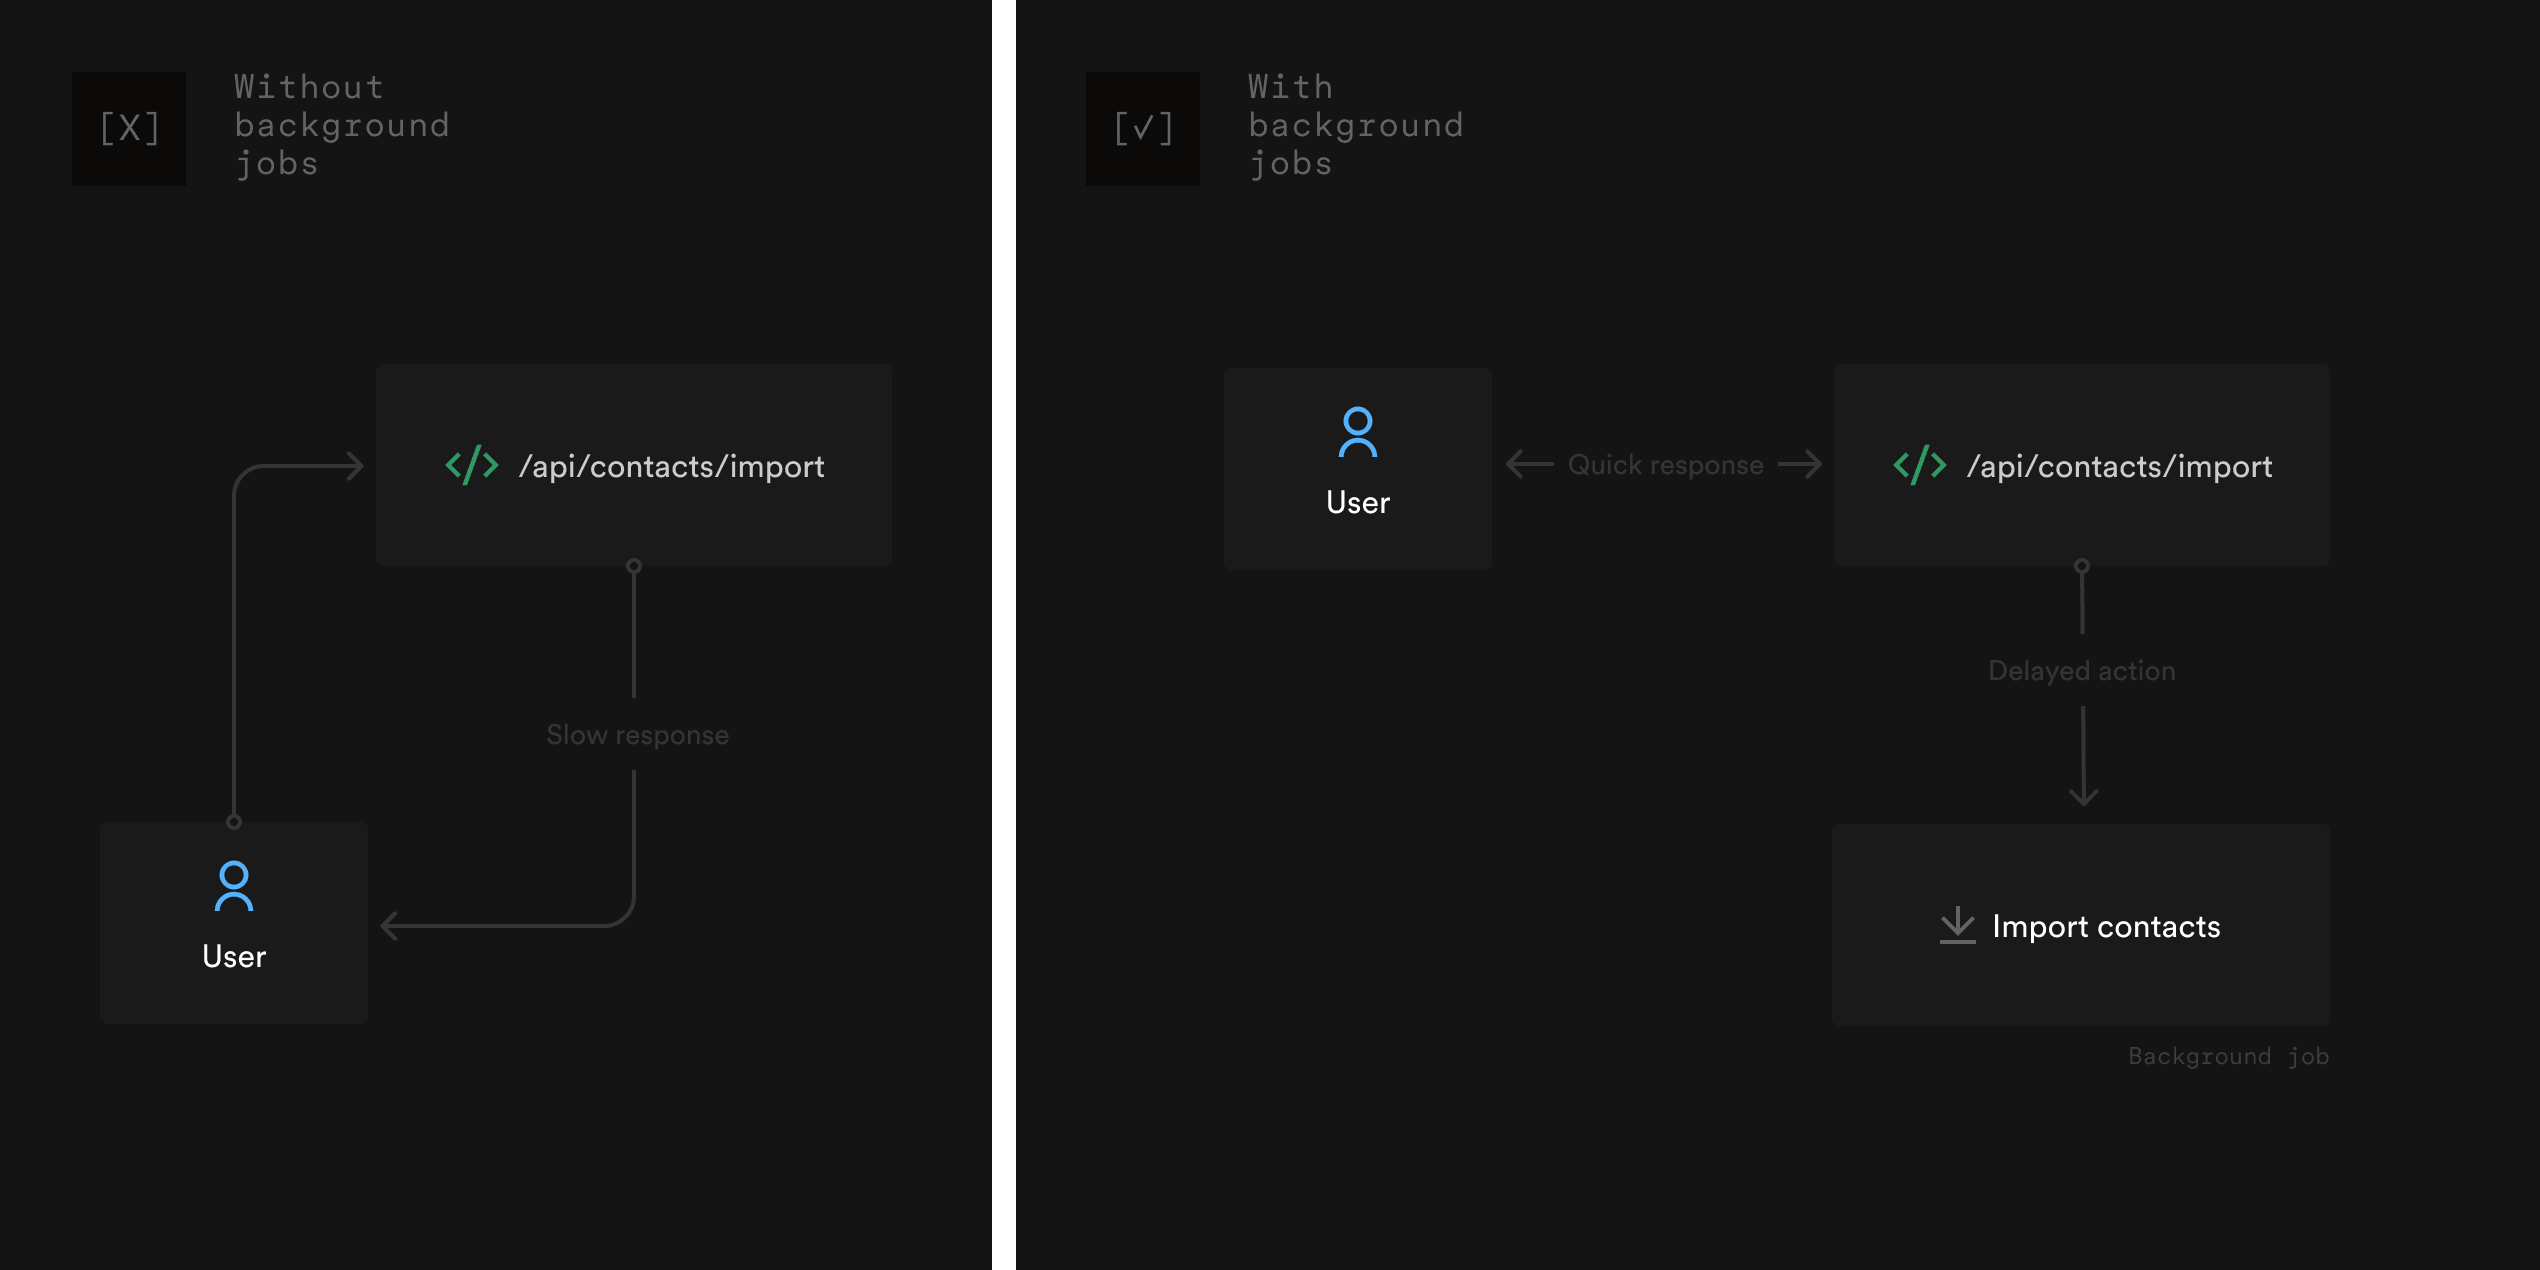
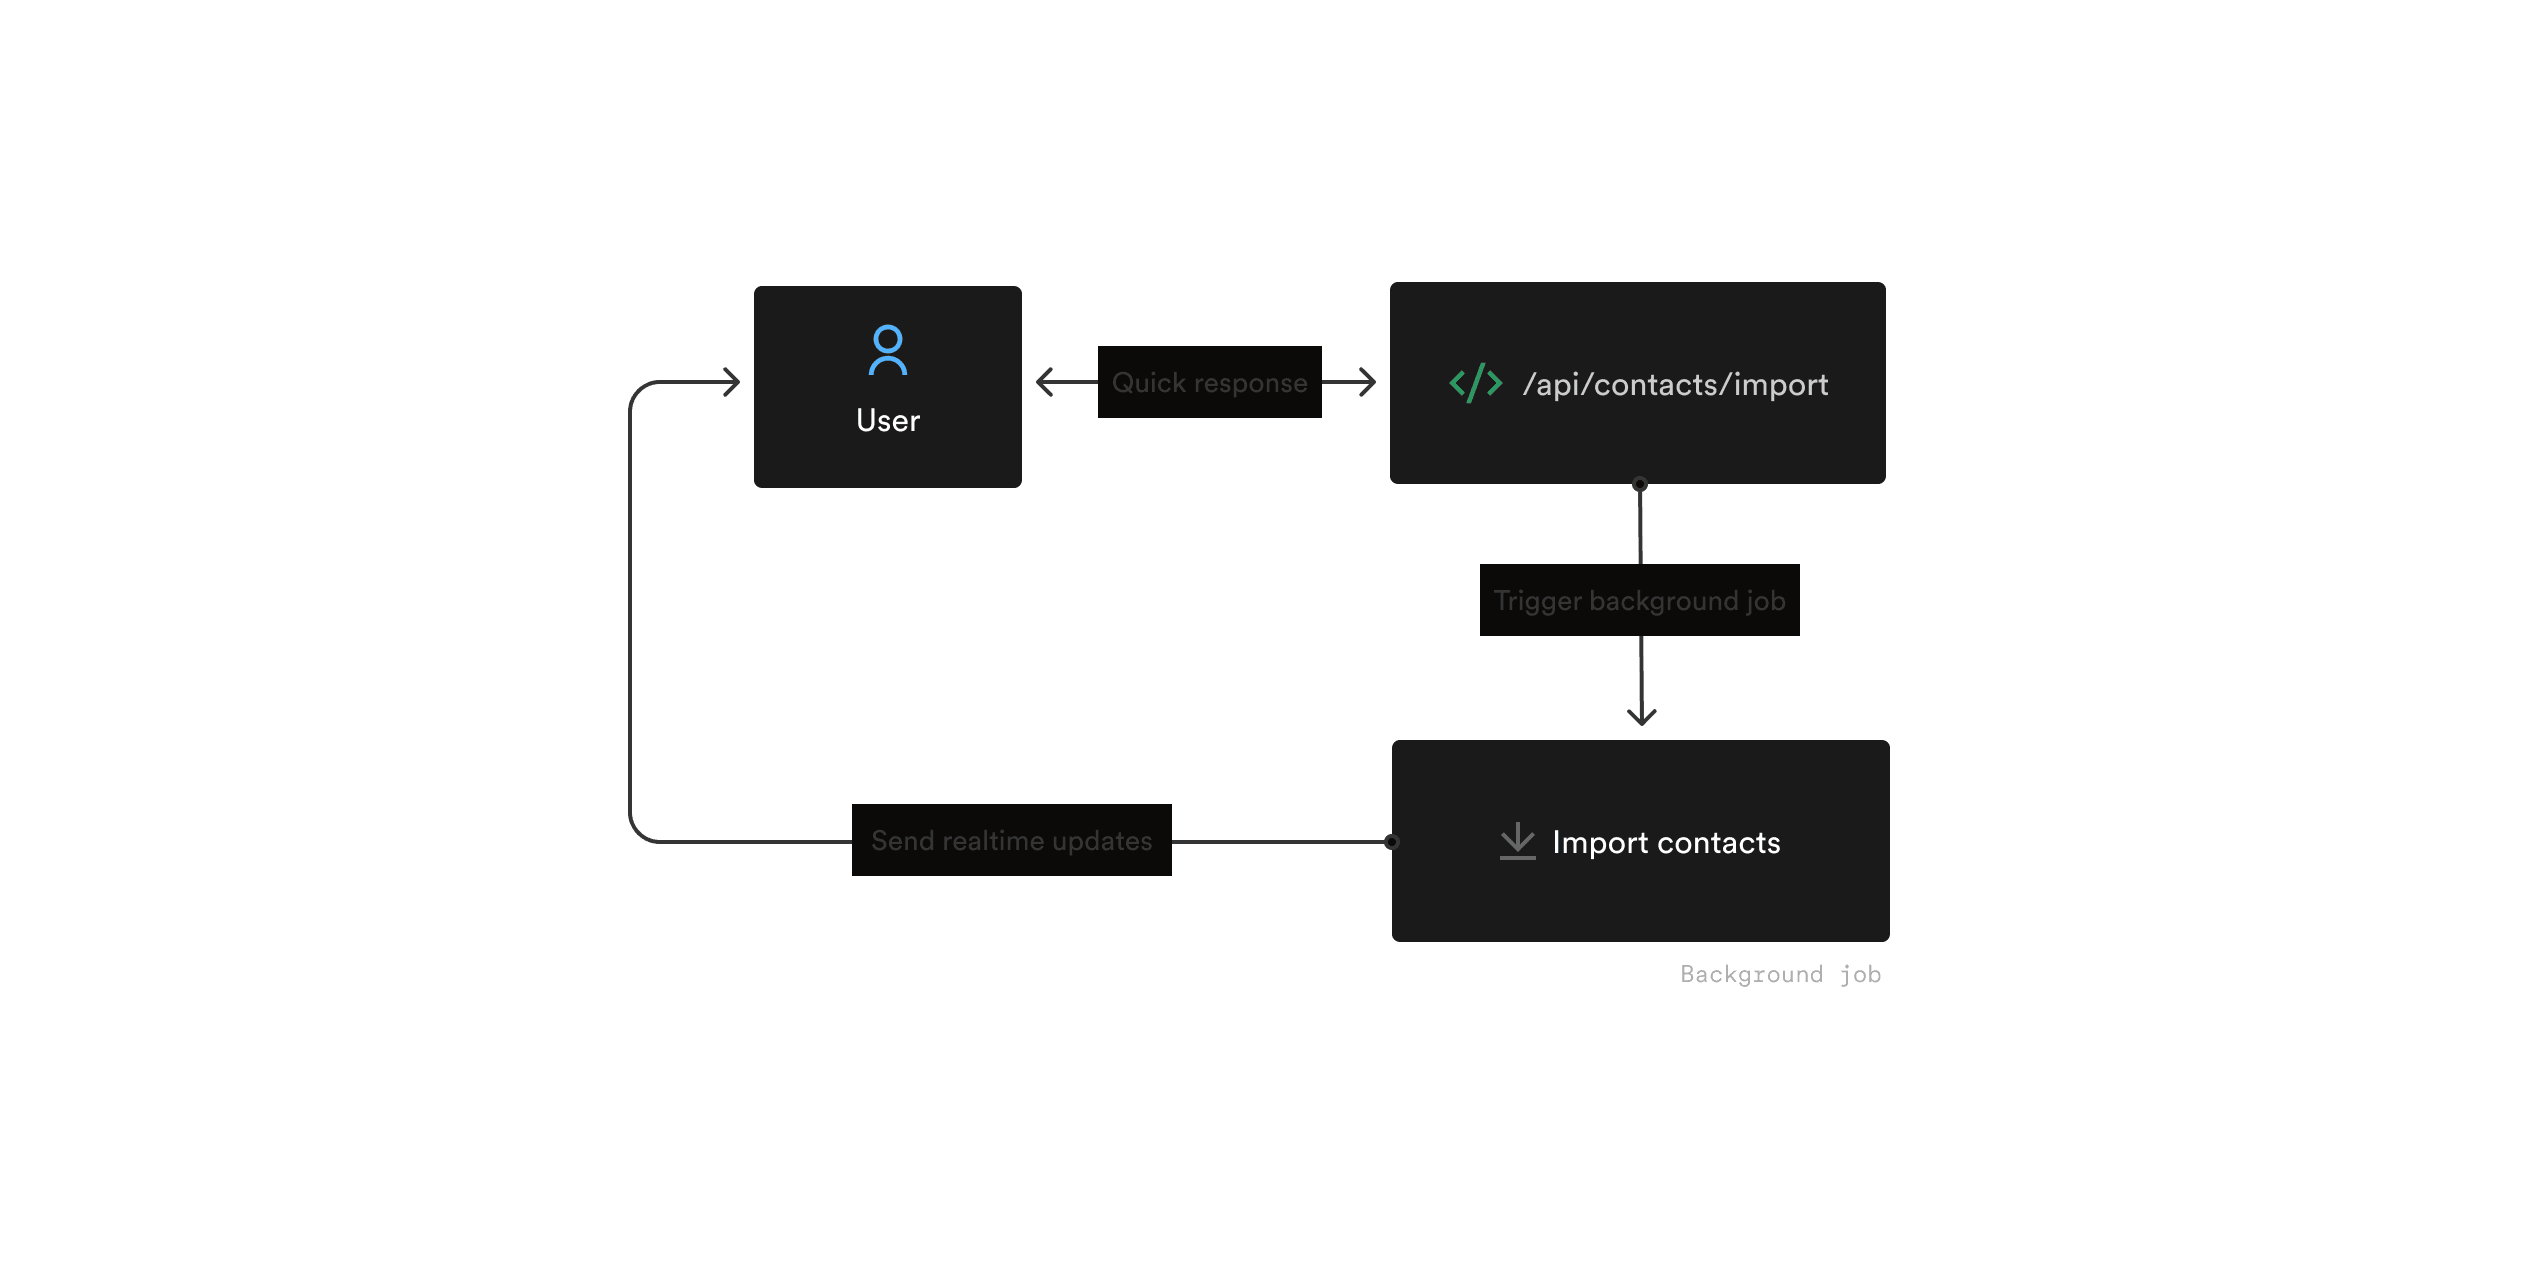
When invoked, a background job gets added to a queue processed by a background jobs engine (e.g., Inngest) that picks jobs from the queue in the correct order. In addition to moving time-consuming work outside of the API, background jobs also enable retrying failed jobs, bringing more reliability to backend work coupled with external services like LLM APIs or email providers:
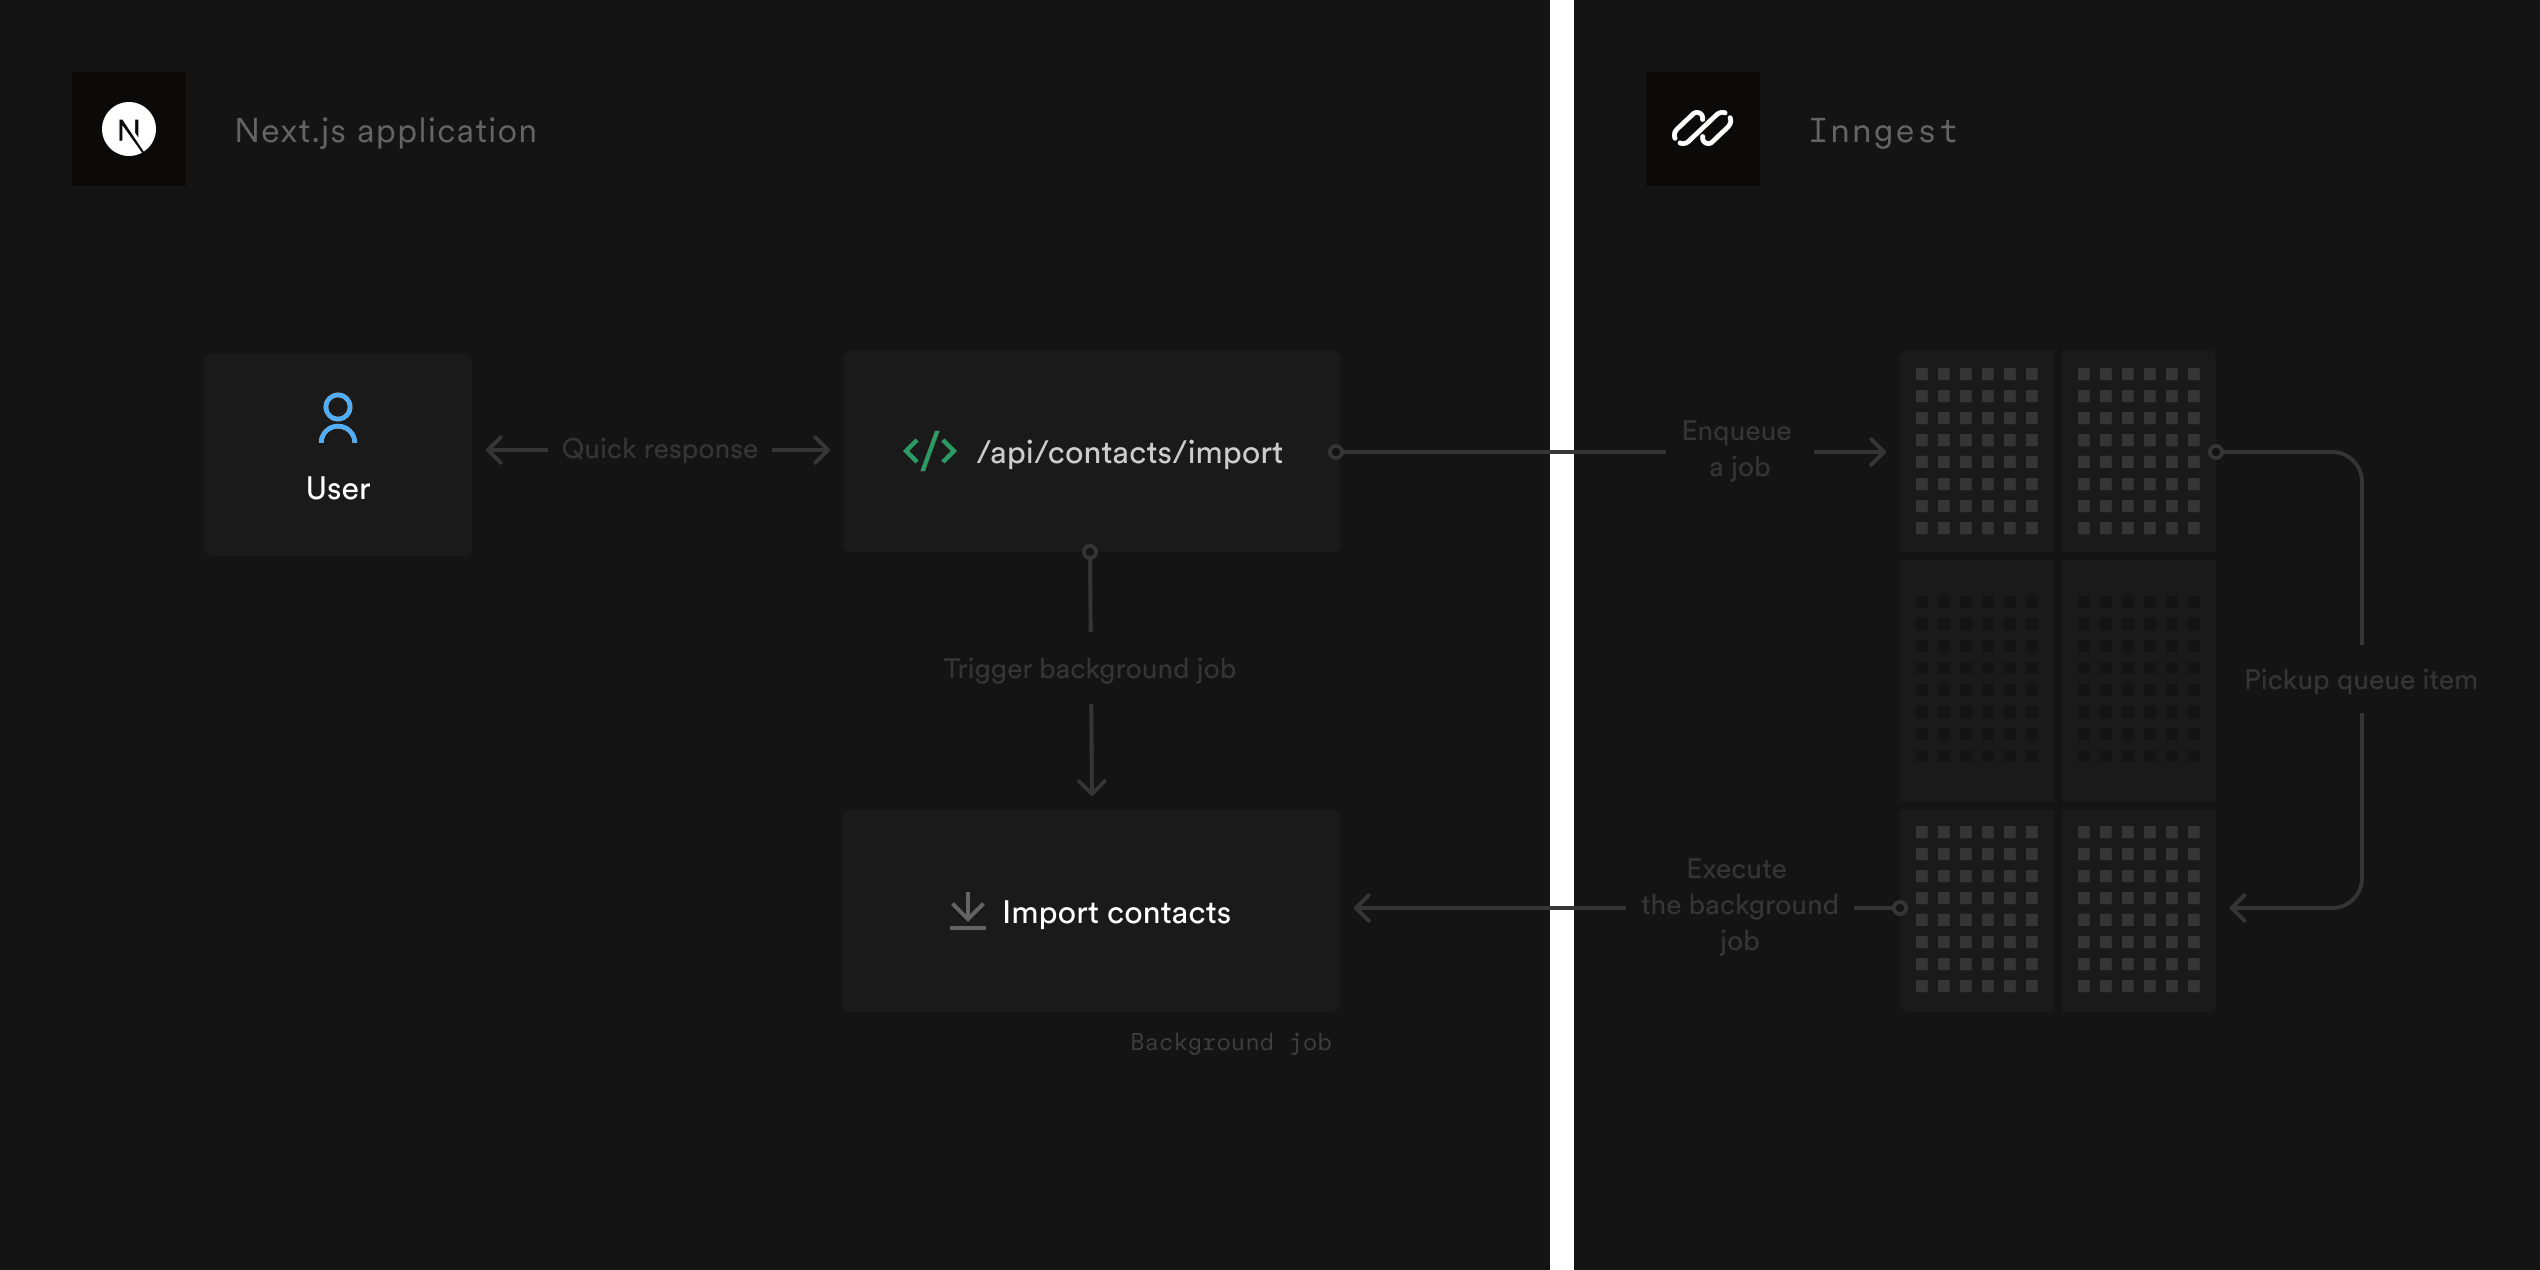
Here's how it works in a Next.js app:
- User triggers an action: For example, uploading a CSV of contacts by clicking "Import contacts"
- API enqueues a background job: Instead of processing everything immediately, your API endpoint creates a job (using Inngest) describing the work to be done.
- Job runs asynchronously: Inngest picks up the job and runs it in the background, independent of the user's request.
- User gets an immediate response: The API can quickly respond to the user (e.g., "Import started!"), keeping the UI fast and responsive.
- Job progress and completion: As the job runs, it can update the database and send an email notification once the import is complete.
Why use background jobs?
- Performance: Keeps your API endpoints fast by moving heavy work out of the request cycle.
- Reliability: Jobs can be retried automatically if they fail, ensuring important work gets done.
- Scalability: Jobs can be processed in parallel, handling large workloads efficiently.
- User Experience: Users aren't left waiting for slow operations—they can continue using your app while work happens in the background.
How do real-time updates work?
Real-time updates allow your application to instantly inform users about the progress of long-running background jobs—without requiring them to refresh the page or poll for updates. This is especially important for workflows like sending bulk emails, where users want to see live feedback on the status of their actions.
Real-time updates are made possible by a technology called WebSocket. WebSocket is a protocol that enables persistent, two-way communication between the browser and the server. Unlike traditional HTTP requests, which require the client to repeatedly ask the server for new information (polling), a WebSocket connection stays open, allowing the server to instantly push updates to the client as soon as something changes. This makes it ideal for delivering live progress, notifications, and logs from your background jobs directly to the user's browser in real time (without the latency of polling every x seconds).
Here's how it works:
- Background job emits messages: As your job processes data (e.g., importing contacts or sending emails), it sends progress updates or status messages using Inngest's Realtime API.
- Frontend subscribes to updates: Your React components use a hook or subscription to listen for these messages, scoped to the current user or job.
- UI updates instantly: As soon as a new message is received, the UI updates in real time—showing progress bars, logs, or notifications.
Benefits of real-time updates:
- Transparency: Users can see exactly what's happening, reducing uncertainty.
- Engagement: Live feedback keeps users engaged and informed, especially during long operations.
- Error handling: If something goes wrong, users are notified immediately and can take action.
Inngest as a background jobs engine
While this guide focuses on two primary use cases requiring background jobs, improving the user experience or scaling your web applications is a wider topic involving other concepts such as scalability with Flow Control, recovery tactics for production use cases, and more.
Inngest is an orchestration engine enabling developers to build, operate, and scale background jobs and workflows. Its TypeScript SDK provides features ranging from simple background jobs to more advanced scalable workflows designed for scale. In addition to its SDKs, Inngest also provides a platform offering observability (charts & usage), recovery tools (bulk cancellations, job replays), and integrations with other platforms like Vercel. Finally, Inngest's Realtime feature provides an API to send real-time updates to users for long-running background jobs.
You can install and configure Inngest in your Next.js app in under 5 minutes by following this quickstart.
Installing new dependencies
You can install the Inngest SDK and its Realtime SDK using the following command:
npm i inngest @inngest/realtime
Setting up Inngest
Let's start by installing and configuring Inngest in CampaignCraft.
First, we'll create a new inngest/functions.ts file as follows:
import { Inngest } from 'inngest'export const client = new Inngest({id: 'campaign-craft'})// our background jobs definition will go here
Then, we will create a new Next.js API Route to enable the Inngest orchestration engine to trigger background jobs defined in the application:
import { serve } from "inngest/next";import { inngest } from "@/src/inngest/functions";export const { GET, POST, PUT } = serve({client: inngest,functions: [// we will reference our background jobs here],});
Inngest is now set up in the Next.js app. Let's now look at how to implement the contacts importer feature using a background job.
Import contacts from a background job
CampaignCraft's first main feature is a CSV contacts import which segments the newly imported contacts using AI (OpenAI).
Implementing this feature directly in a Next.js API Route comes with many drawbacks:
- The import and AI processes are tied to the user request
- The import and AI processes are slow, forcing the user to stay on the page until the import finishes (even with a Next.js streaming response).
- A single LLM request failure will cancel the whole import, without retrying.
For this reason, we will implement this feature using a background job,
- Enabling the user to leave the page after submitting the file and getting notified by email when the import is complete
- Enforcing automatic isolated retries, making the import and AI processing more resilient
First, let's update the existing POST /api/contacts API Route to trigger the background job:
import { NextRequest, NextResponse } from "next/server";import { inngest } from "@/lib/inngest";// POST /api/contacts - import contacts (triggers Inngest job)export async function POST(req: NextRequest) {// For simplicity, assume JSON body with contacts array (CSV parsing can be added later)const data = await req.json();// Send event to Inngestawait inngest.send({name: "app/contact.import",data,});return NextResponse.json({ success: true, message: "Import job triggered via Inngest" },{ status: 202 });}
Let's now implement the contact-import background job.
Writing our first background job: contact-import
Background jobs written with Inngest are defined using the inngest.createFunction() method, as shown in the src/inngest/functions.ts file below:
import { Inngest } from 'inngest'import { eq } from "drizzle-orm";import { db, contacts, contactSegments, segments } from "@/lib/db";import { segmentContacts } from "@/lib/openai";import { sendEmail } from "@/lib/resend";export const client = new Inngest({id: 'campaign-craft'})export const contactImport = inngest.createFunction({ id: "contact-import" },{ event: "app/contact.import" },async ({ event, step }) => {// 1. Parse contacts from event dataconst contactList = event.data.contacts;if (!Array.isArray(contactList) || contactList.length === 0) {return { success: false, message: "No contacts provided" };}// Require email for each contactif (contactList.some((c) => !c.email)) {return { success: false, message: "All contacts must have an email" };}// 2. Insert contacts into the databaseconst inserted = await step.run("insert-contacts", async () => {return db.insert(contacts).values(contactList).returning();});// 3. Segment contacts using OpenAI (as an Inngest step)const segmentation = await segmentContacts(inserted, step);await step.run("save-segments-and-assignments", async () => {// 1. Insert segments (if not already present)// For simplicity, insert all segments and ignore conflicts (e.g., on name)await db.insert(segments).values(segmentation.segments.map((s) => ({name: s.name,description: s.description ?? null,}))).onConflictDoNothing().returning();// 2. Fetch all segments to get their IDs (by name)const allSegments = await db.select().from(segments);const segmentNameToId = Object.fromEntries(allSegments.map((s) => [s.name, s.id]));// 3. Insert assignments into contact_segmentsawait db.insert(contactSegments).values(segmentation.assignments.map((a) => ({contactId: a.contactId,segmentId: segmentNameToId[a.segmentName],}))).onConflictDoNothing();});// 4. Send notificationawait step.run('send-notification', async () => {return await sendEmail({to: process.env.ADMIN_EMAIL!,subject: `Contacts import completed!`,html: `${contactList} has been imported into the following segments: ${segmentation.segments.map(s => s.name)}`,});})return {success: true,imported: inserted.length,contactIds: inserted.map((c) => c.id),segmentation,};});
Let's now create a background job sending real-time updates for the campaign sending feature.
Sending campaigns using a real-time background job
Sending a campaign is a quicker process than importing contacts. Still, it benefits from running inside a background job to enable the user to leave the page before it completes or to make it more resilient to failures.
To keep the user informed of the progress of the batch email sending, our campaign-send background job will send regular real-time updates.
Configuring Inngest Realtime
Inngest Realtime provides a simple API to stream updates from background jobs to React components.
First, let's update our Inngest client configuration by adding the @inngest/realtime middleware:
import { Inngest } from "inngest";import { realtimeMiddleware } from "@inngest/realtime";// ...export const inngest = new Inngest({id: "campaigncraft-app",middleware: [realtimeMiddleware()],});// ...
Then, below the contact-import Inngest function, let's define a unique channel that we will later use to send real-time messages:
import { channel, topic } from "@inngest/realtime";import { z } from "zod";import { eq } from "drizzle-orm";import { inngest } from "@/lib/inngest";import { db, campaigns, contacts, contactSegments, segments } from "@/lib/db";import { segmentContacts } from "@/lib/openai";import { sendEmail } from "@/lib/resend";// Inngest client definition ...// `contact-import` function definition ...// create a channel for each campaign, given a campaign ID. A channel is a namespace for one or more topics of streams.export const campaignSendChannel = channel((campaignId: string) => `campaign-send:${campaignId}`).addTopic(topic("progress").schema(z.object({message: z.string(),complete: z.boolean(),})));
Sending Real-time messages
Our second background job, campaign-send, features some new calls to a new API: publish().
This API enables you to send messages to a given channel and topic:
import { channel, topic } from "@inngest/realtime";import { z } from "zod";import { eq } from "drizzle-orm";import { inngest } from "@/lib/inngest";import { db, campaigns, contacts, contactSegments, segments } from "@/lib/db";// create a channel for each campaign, given a campaign ID. A channel is a namespace for one or more topics of streams.export const campaignSendChannel = channel((campaignId: string) => `campaign-send:${campaignId}`).addTopic(topic("progress").schema(z.object({message: z.string(),complete: z.boolean(),})));export const campaignSend = inngest.createFunction({ id: "campaign-send" },{ event: "app/campaign.send" },async ({ event, step, publish }) => {const {campaignId,segmentId,scheduledAt,subject: eventSubject,content: eventContent,} = event.data;await publish(campaignSendChannel(campaignId).progress({message: "Preparing the campaign...",complete: false,}));// 1. Fetch campaignconst [campaign] = await db.select().from(campaigns).where(eq(campaigns.id, campaignId));if (!campaign) {return { success: false, message: "Campaign not found", campaignId };}// 2. Fetch contacts in the segment (with email)const segmentContacts = await db.select({id: contacts.id,firstname: contacts.firstname,lastname: contacts.lastname,email: contacts.email,}).from(contacts).innerJoin(contactSegments, eq(contactSegments.contactId, contacts.id)).where(eq(contactSegments.segmentId, segmentId));await publish(campaignSendChannel(campaignId).progress({message: `Sending ${campaign.name} to ${segmentContacts.length} contacts`,complete: false,}));const emailSubject = eventSubject || campaign.subject;const emailContent = eventContent || campaign.content;// 3. Send emails using Resendconst results = [];for (let i = 0; i < segmentContacts.length; i++) {const contact = segmentContacts[i];await step.run('send-email', async () => {const res = await sendEmail({to: contact.email,subject: emailSubject,html: emailContent,});results.push({contactId: contact.id,email: contact.email,status: "sent",messageId: res.data?.id,});})// Every 5 contacts, publish progressif ((i + 1) % 5 === 0 || i === segmentContacts.length - 1) {await publish(campaignSendChannel(campaignId).progress({message: `Sent ${i + 1} of ${segmentContacts.length} contacts... (Subject: ${emailSubject})`,complete: false,}));}}await campaignSendChannel(campaignId).progress({message: `The ${campaign.name} is now sent! (Subject: ${emailSubject})`,complete: true,});// 5. Return summaryreturn {success: true,campaignId,segmentId,scheduledAt,sent: results.filter((r) => r.status === "sent").length,failed: results.filter((r) => r.status === "error").length,results,message: "Campaign send job completed",};});
Let's now update our front-end (React components) to subscribe to the real-time updates!
Subscribing to real-time messages from the front-end
Subscribing to real-time updates sent from Inngest background jobs requires two changes.
First, create an app/actions.ts file as follows:
"use server";import { inngest } from "@/lib/inngest";import { campaignSendChannel } from "@/src/inngest/functions";import { getSubscriptionToken, Realtime } from "@inngest/realtime";// securely fetch an Inngest Realtime subscription token from the server as a server actionexport async function fetchSubscriptionToken(campaignId: string): Promise<Realtime.Token<typeof campaignSendChannel, ["progress"]>> {const token = await getSubscriptionToken(inngest, {channel: campaignSendChannel(campaignId),topics: ["progress"],});return token;}
Let's now add the useInngestSubscription() hook to our Next.js page to subscribe to live updates:
"use client";import { useEffect, useState } from "react";import { useParams } from "next/navigation";import { useInngestSubscription } from "@inngest/realtime/hooks";import { fetchSubscriptionToken } from "@/app/actions";export default function CampaignViewPage() {const { id } = useParams();const [enabled, setUpdatesEnabled] = useState<boolean>(true);const { latestData: latestUpdate } = useInngestSubscription({refreshToken: () => fetchSubscriptionToken(id as string),bufferInterval: 500,enabled,});// ...async function handleSend() {const res = await fetch(`/api/campaigns/${id}/send`, {method: "POST",headers: { "Content-Type": "application/json" },body: JSON.stringify({ subject, content }),});if (!res.ok) throw new Error(await res.text());setUpdatesEnabled(true);}return (<div className="flex flex-col gap-8 py-12"><div className="flex items-center gap-4 mb-4"><h1 className="text-2xl font-bold">Edit Campaign: {campaign.name}</h1></div><form className="flex flex-col gap-6 max-w-xl">{/* ... */}</form>{/* Updates Section */}{latestUpdate ? (<><div className="mt-8"><h2 className="text-lg font-semibold mb-2">Your campaign is being sent!</h2>{latestUpdate.data.message}</div></>) : null}</div>);}
CampaignCraft is now leveraging two background jobs to power a smooth user experience. Let's test it out!
Try it!
Start the Next.js application by running the following command:
npm run dev
Then, start the Inngest DevServer as follows:
curl -sSfL https://cli.inngest.com/install.sh | sh# Move the binary into your pathinngest dev
Open the Inngest DevServer (127.0.0.1:8288/runs) in a new tab.
Then, open CampaignCraft at http://localhost:3000 and click on "Import contacts."
From the import page, select the fake_contacts.csv file available in the repository and import it.
You should see the import process running in the Inngest DevServer.
Now navigate back to the home page, and click on the "Create Campaign" button. Create a campaign by selecting a segment, generating some AI content, and sending it. You will see the campaign being sent with real-time updates.
Conclusion
In this article, we explored how to implement real-time updates for background jobs in a Next.js application using Inngest Realtime. The main concepts covered include:
- Background Jobs: Offloading long-running or resource-intensive tasks (like sending email campaigns) to run asynchronously in the background, improving user experience and scalability.
- Inngest Realtime: Leveraging Inngest's real-time capabilities to send live updates from background jobs to the frontend, enabling users to see progress and results as they happen.
- Channels and Topics: Organizing real-time messages using channels (grouping messages for a specific background job) and topics (categorizing message types within a channel).
- Subscription Tokens: Securely generating tokens on the server to allow clients to subscribe to specific channels and topics, ensuring only authorized access to updates.
- React Integration: Using the
useInngestSubscriptionhook in React components to subscribe to updates, and updating the UI in response to new messages from background jobs.
By combining these concepts, you can build responsive, user-friendly applications that keep users informed about the status of their background processes in real time.
Frequently Asked Questions
Q: Can I limit the number of concurrent background jobs running at once?
You can limit the number of concurrent runs for a given background job by configuring concurrency.
The background job below will only have 2 concurrent runs at the same time (at most):
export const contactImport = inngest.createFunction({ id: "contact-import", concurrency: 2 },{ event: "app/contact.import" },async ({ event, step }) => {// ...})
Q: Can I limit the background jobs retries?
Background jobs are retried up to 4 times by default and can be configured using the retries option.
The example below shows a function with no retries:
export const contactImport = inngest.createFunction({ id: "contact-import", retries: 0 },{ event: "app/contact.import" },async ({ event, step }) => {// ...})
Q: What happens if the client loses connection during a background job?
The useInngestSubscription() React hook provided by @inngest/realtime will automatically resume any lost connection.
Any permanent loss of connection will be reflected in the error and state properties returned by the hook:
// ...const { data, error, state } = useInngestSubscription({refreshToken: () => fetchSubscriptionToken(id as string),bufferInterval: 500,enabled,});// state === "closed"// ...
Q: Is it possible to subscribe to multiple channels or topics at once?
Every subscription is bound to a channel and one or more of its topics.
To subscribe to multiple topics from a given channel, list them in the topics argument passed to getSubscriptionToken():
"use server";import { inngest } from "@/lib/inngest";import { myChannel } from "@/src/inngest/functions";import { getSubscriptionToken, Realtime } from "@inngest/realtime";// securely fetch an Inngest Realtime subscription token from the server as a server actionexport async function fetchSubscriptionToken(campaignId: string): Promise<Realtime.Token<typeof myChannel, ["progress"]>> {const token = await getSubscriptionToken(inngest, {channel: myChannel(campaignId),topics: ["topic1", "topic2", "topic3"],});return token;
To subscribe to multiple channels, create multiple subscription tokens and call useInngestSubscription() once per channel.
Q: How do I handle errors or retries in the background job and reflect them in the UI?
Inngest offers multiple ways to handle errors, as described in this guide.